VS Code Server#
The VS Code Server app provides the browser version of Visual Studio Code (VS Code). For more information, check out the official VS Code guidelines.
Warning
Please be cautious about which extensions you use/install with VS Code, as malware extensions are being reported more frequently. We strongly recommend only installing extensions from verified publishers as indicated by the blue checkmark next to the publisher’s name.
For more info, please check the docs on Extension runtime security.
Before you connect#
If you use VS Code only for developing or editing code (or any generic ASCII file), it is strongly recommended to use a single core on the wICE interactive partition. For testing, debugging and eventually executing your code, you may request resources from any other relevant partition, as long as you remember that these resources are meant for intensive loads. So, limit interactive usage on these partitions to not waste compute cycles that someone else might be waiting for.
VS Code automatically generates the hidden folders .vscode and
.vscode-server in your $VSC_HOME, which can become quite big, especially
when installing multiple extensions. To prevent $VSC_HOME from filling up,
we recommend creating symlinks to redirect these folders to your $VSC_DATA
directory. If these folders already exist, move them to your $VSC_DATA
directory before creating symlinks. Execute the following commands to automate
the process:
[[ -d ~/.vscode ]] && mv -nv ~/.vscode $VSC_DATA/
[[ -d ~/.vscode-server ]] && mv -nv ~/.vscode-server $VSC_DATA/
mkdir -pv $VSC_DATA/vscode $VSC_DATA/vscode-server
[[ -L ~/.vscode ]] || ln -sv $VSC_DATA/vscode ~/.vscode
[[ -L ~/.vscode-server ]] || ln -sv $VSC_DATA/vscode-server ~/.vscode-server
Terminal in VS Code#
To open a terminal window in VS Code, click the three horizontal lines in the
top left corner and select ‘Terminal - New Terminal’. This will open a shell on
the node you are running your session on. You can use this as a regular shell,
meaning that you can submit jobs, load modules and so on. Notice that, by
default, you are starting in your $VSC_HOME directory.
KU Leuven By default, a Python and a Git module are already loaded, which means you can use both Python and git from a terminal window within VS Code.
VS Code as an IDE#
VS Code contains many different options and menus, but we will only discuss how to set it up as an integrated development environment (IDE) for your favorite coding language. For any language you want to use you need two things: an installation of the specific interpreter or compiler, and a VS Code extension that allows you to connect to it. The extensions can be found in the ‘extensions’ menu. In what follows, the steps for both Python and R are described.
Python IDE#
There are multiple Python extensions available, but only the Microsoft ‘Python’ extension has been tested by VSC support. To install this extension, go to ‘Extensions’, search for ‘Python’, and install the one developed by ‘ms-python’.
Once installed, if you open a script, you can use VS Code as an IDE and run the lines of code from within the script (keyboard shortcut shift+enter). VS Code will start a Python session with the currently selected Python interpreter.
KU Leuven If you did not select another one, this should default to the loaded Python module.
The ‘Python’ extension gives you the possibility to choose other interpreters as
well. In the right bottom corner, you can see the selected Python version right
next to ‘Python’. If you click the Python version, a list of Python versions
and paths will appear in the command palette. You can also use virtual
environments or Conda environments here (if you have any environments already,
you should see them here as well). We recommend against using any of the
‘system’ Python versions (located under /bin or /usr/bin), as they are
quite old.
For more information about creating customized Python environments, have a look at the documentation on python packages.
Python modules and environments#
To use Python and Python packages provided by the software modules in the Python IDE, follow these steps:
In the ‘Pre-run Scriptlet’ of the resources form,
module loadthe modules that you need. A commonly used software module isSciPy-bundle, a bundle of data science packages such asnumpy,pandas, andscipy.In the VS Code interface, select the corresponding Python version + path as outlined above. Make sure to select the exact same path as that of your loaded Python module. To get the path, type the following command in your VS Code terminal:
which python
The steps for using virtual environments on top of loaded software modules are exactly the same. Note that activating the virtual
environment in the ‘Pre-run Scriptlet’ is not required: just selecting the
Python version + path located in the virtual environment at
<path-to-venv>/bin/python3.x is sufficient.
R IDE#
For full functionality, it is recommended to work with Conda environments. For the time being, there are some issues with using modules together with functionalities, like plotting.
There are some package requirements if you want to use R in VS Code. The following command creates a functional environment (of course, add any other packages you need):
conda create -n <env_name> -c conda-forge r-base r-remotes r-languageserver r-httpgd r-jsonlite
Once you’ve created your environment, go ahead and start a VS Code session on Open Ondemand. On the left-hand side, click the extension menu and search for ‘R’. You should install the ‘R’ extension of ‘REditorSupport’.
Now there are two ways to use the R installation inside your Conda environment:
Open a terminal (three horizontal lines in the upper left corner - Terminal - New Terminal), and activate your Conda environment. Now type
Rin the terminal and you will be able to use your scripts interactively (R gets attached as soon as you start it).You can also set the path to the R version that needs to be attached (better if you always use the same Conda environment). Go to ‘Extensions’, and click the settings wheel next to the R extension. Select ‘Extension Settings’ and search for the ‘R > RTerm: Linux’ setting. Paste the path to your Conda env there (usually it will look like
/data/<vsc_institute>/xxx/vscxxxxx/conda_envs/<env_name>/lib/R)
Note
To run your script line-by-line, place your cursor on a desired line, and press the key combination ‘ctrl+enter’ on your keyboard.
(documentation not yet available)
Running Jupyter inside VS Code#
It’s also possible to edit/run Jupyter notebooks inside VS Code. Below are the instructions for Python:
When using Jupyter with a Pure module environment, make sure to load any modules you need in the ‘Pre-run scriptlet’ in the resources form.
VUB If you also need the Matplotlib Lab extension, make sure to also load a compatible
ipymplmodule.In your VS Code session, install the ‘Jupyter’ extension developed by ‘ms-toolsai’.
Open a Jupyter notebook or create a new one.
Click ‘Select Kernel’ at the top right of the app.
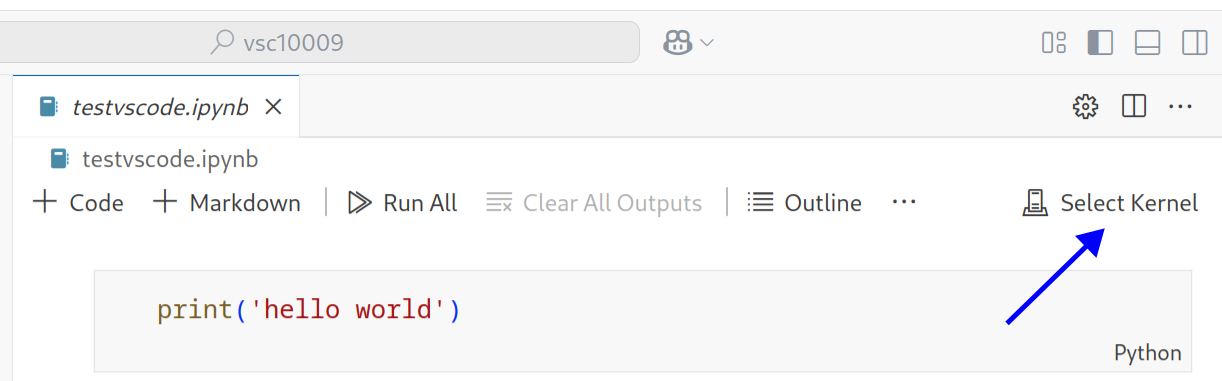
Fig. 10 Click ‘Select Kernel’ to select a Python environment or Jupyter kernel.#
In the command palette, select ‘Python Environments…’, next select the Python version and path that you need. Alternatively, you can also select ‘Jupyter Kernel…’ and select a user-defined Jupyter kernel.