SFTP clients for Tier-1 Data#
SFTP stands for Secure (SSH) File Transfer Protocol, which is a network protocol for securely accessing, transferring and managing large files and sensitive data. It runs over the SSH protocol. Therefore SSH certificates are used for authentication.
SFTP needs an SFTP client and server. It uses SSH to transfer files and requires that the client be authenticated by the server. An STFP client is software that lets users connect to the Tier-1 Data service through the STFP server.
With SFTP, users can transfer files stored in the Tier-1 Data service directly to and from their local files. In other words, users can access their project collections in the Tier-1 Data service from their local computers using any SFTP-enabled client applications such as OS built-in command-line tool, Cyberduck, WinSCP, and FileZilla. Moreover, some SFTP clients allow to mount the Tier-1 Data service as a virtual folder to their Windows machines.
SSH Certificate#
SSH certificates are required to authenticate SFTP connections to the Tier-1 Data service. For each new connection, the SSH client must present a user certificate signed by VSCentrum.
To obtain your SSH certificate, please follow the instructions from the following link.
If you encounter any issues or have questions, please contact us at data@vscentrum.be.
Connections to Tier-1 Data Using CLI#
Both Windows and Linux users can connect to a remote server (the Tier-1 Data service) through SFTP commands on a default terminal installed (Windows Command Prompt, PowerShell, xterm etc.)
You can establish an SFTP session by issuing the following command.
sftp yourUserName@rdmsftp.icts.kuleuven.be
This will connect the Tier-1 Data service and your prompt will change to an
SFTP prompt. Most of the SFTP commands are similar or identical to the
Linux shell commands. To get a list of all available SFTP commands, type
help or ?.
As an alternative client you can also use lftp. It is a
sophisticated file transfer program that allows users to launch several
commands in parallel in background and to reconnect and continue
transfers in the event of a disconnection. You should first install
lftp on your operating system to be able to use it.
On Ubuntu:
sudo apt install lftp
On RHEL/CentOS Stream:
sudo yum install lftp
Windows users can contact us if they want to use
lftpas a CLI tool since the Chocolatey package manager is needed to install it.On macOS:
brew install lftp
Once you have lftp installed, execute the command below to get a
SFPT session in the Tier-1 Data service.
lftp -u yourUserName, sftp://rdmsftp.icts.kuleuven.be
You will be presented with the lftp prompt. You can type help to get
list of available commands and their usage.
Connections to Tier-1 Data Using GUI#
There are several GUI programs that users can use to interact with the Tier-1 Data service through the SFTP protocol.
FileZilla#
FileZilla is a free, open-source client that allows you to transfer files between a local computer and a remote server. It is available for Windows, Linux, and macOS.
Getting Started:
If you use a KU Leuven-managed device, download and install FileZilla from the Software Center.
Warning
On a non KU Leuven-managed deviced, FileZilla can be downloaded from the extended list on the official website. Do not try to download it from the homepage, or click on the big green “Download FileZilla Client” button, since it will download malware instead.
Open the installed FileZilla, and click ‘Site Manager’
Select
SFTP - SSH File Transfer Protocolin the field of ProtocolEnter
rdmsftp.icts.kuleuven.bein the field of Host and22in the field PortInput your
Tier-1 Data usernamein the field UsernameLeave the field Password empty and set Authentication type to
Interactive
Once you have logged in, you will see a file browser on the left side of the window. This is the file browser for your local computer. On the right side of the window, you will see a file browser for the remote server.
Transferring Files:
To transfer files from your local computer to the remote server, simply select the file or folder you wish to transfer, and drag and drop it into the remote file browser
To transfer files from the remote server to your local computer, simply select the file or folder you wish to transfer, and drag and drop it into the local file browser
You can also transfer files by right-clicking on the file or folder, and selecting ‘Upload” or ‘Download’
Managing Files:
To rename a file or folder, right-click on the file or folder, and select ‘Rename’
To delete a file or folder, right-click on the file or folder, and select ‘Delete’
To create a new folder, right-click on the file browser, and select ‘Create Directory’
To edit a file, right-click on the file, and select ‘View/Edit’
Cyberduck#
Cyberduck is a free, open-source file transfer program for Windows, Mac, and Linux. It is designed to make transferring files to and from remote servers via various protocols.
Getting Started:
Download and install the Cyberduck program
Open the program and and click ‘Open Connection’
Select
SFTP (SSH File Transfer Protocol)in the top drop-down fieldEnter
rdmsftp.icts.kuleuven.bein the field of Server and22in the field PortInput your
Tier-1 Data usernamein the field UsernameLeave the field Password empty
Click the ‘Connect’ button
Using Cyberduck:
To transfer files, drag and drop them from the local directory to the remote directory
To delete files, select them and click the ‘Delete’ button
To create a new directory, click the New Directory/Collection button and enter a name
To rename a file or directory, select it and click the ‘Rename’ button
To edit a file, select it and click the ‘Edit With’ button
To disconnect from the server, click the ‘Disconnect’ button
WinSCP#
WinSCP is a free and open-source file transfer client for Windows OS. It allows you to securely transfer files between your local computer and a remote server using various protocols.
Getting Started:
Download and install WinSCP
Launch WinSCP and click ‘New Session’
Select the ‘New Site’ button
Select
SFTPin the ‘File protocol’ drop-down fieldEnter
rdmsftp.icts.kuleuven.bein the field of Host name and22in the field Port numberInput your
Tier-1 Data usernamein the field User nameLeave the field Password empty
Select the ‘Login’ button to connect to the remote server
Using WinSCP:
To transfer a file, simply drag and drop it from one side to the other
When you’re done transferring files, select the ‘Disconnect’ button to end the connection.
Mounting#
Mounting a file system attaches that file system to a directory (mount point) and makes it available to the system. While there are some advantages, there are also some important drawbacks to consider in addition to generic disadvantages of having chances of wasting more disk space, using more resource, etc.:
The metadata management, a core feature of our data management platform is bypassed.
Permissions cannot be changed via this client.
Our SFTP service is fully optimized for standard, direct file transfers. While mounting a folder/directory provides a highly user-friendly experience, it masks the complex network processes running in the background, which may lead to reduced speed and stability. We kindly remind you to verify that your files have completely and successfully transferred.
Mounting on Linux#
Transferring files over an SSH connection by using either SFTP or
lftp is a way of moving small amounts of data between remote and
local or vice versa. In some cases, however, it may be necessary to
share entire directories, or entire filesystems, between two
environments. To this end the sshfs command is used. It is a client
tool for using SSHFS (SSH Filesystem) to mount a remote file system (the
Tier-1 Data system) locally on your machine.
First of all sshfs needs to be installed if it does not already exist
in your machine. You can check this by runnig sshfs --version. The
sshfs tool is available from most distributions’ standard repositories
and is most easily installed using that distribution’s package manager.
Once sshfs is installed, mounting a remote file system safely over SSH is as follows.
First, specify an existing mount point or create a new one.
mkdir myMountPoint
Then, execute the following command to initiate the mount.
sshfs yourUserName@rdmsftp.icts.kuleuven.be:/ myMountPoint
You can now list your mount point to see the existing objects in your remote - the ManGO platform - locally.
Mounting on Windows#
It is also possible to mount your Tier-1 Data directories as a network drive using SFTP. However you need to install some auxiliary packages.
First of all, you will need to install WinFsp and SSHFS-win. There are two ways of installing these packages:
If you want to install them via CLI:
Open your CMD or PowerShell
Run
winget install WinFsp.WinFsp; winget install SSHFS-Win.SSHFS-Win
If you want to install them via installation wizard:
Move these files to a location which is compatible with your group domain policy
Double-click the installer files to begin installation
Only perform the following two steps if you are unable to install the MSI files using the standard Windows wizard:
Open Powershell in admin mode
For each of the two .msi files, run the following command:
msiexec /i <path_to_the_msi>
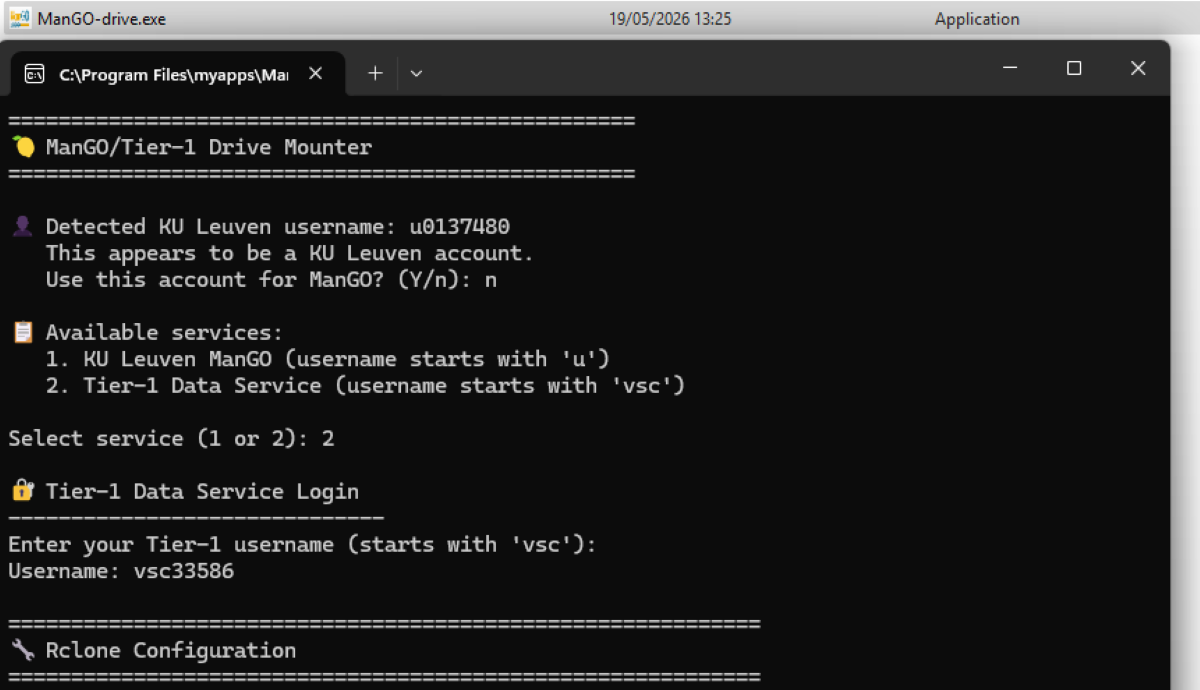
In order to mount the Tier-1 Data system, you need to download either ManGO-drive.exe or ManGO-drive-desktop.exe
which are a wrapper on Rclone. They will make a
configuration file that is needed for Rclone and run commands required
to make Tier-1 Data available as drive via an user interface.
The main distinction between these two executables is that ManGO-drive.exe needs you to keep the terminal window open while it’s running. On the other hand, ManGO-drive-desktop.exe functions as a GUI application that operates independently of the shell and includes advanced features such as certificate validity tracking, automatic rclone detection, connection logging, and various user configuration options.
Instructions for using ManGO-drive:
- Download ManGO-drive.zip via this link and extract its content.
- Download the version of rclone.exe compatible with your system specifications from the official website at https://rclone.org/downloads/.
- Relocate the extracted ManGO-drive.exe and rclone.exe files to a directory where your group domain policy permits the execution of .exe files.
- Launch ManGO-drive.exe by double-clicking the file.
- Follow the prompts to complete the configuration process.
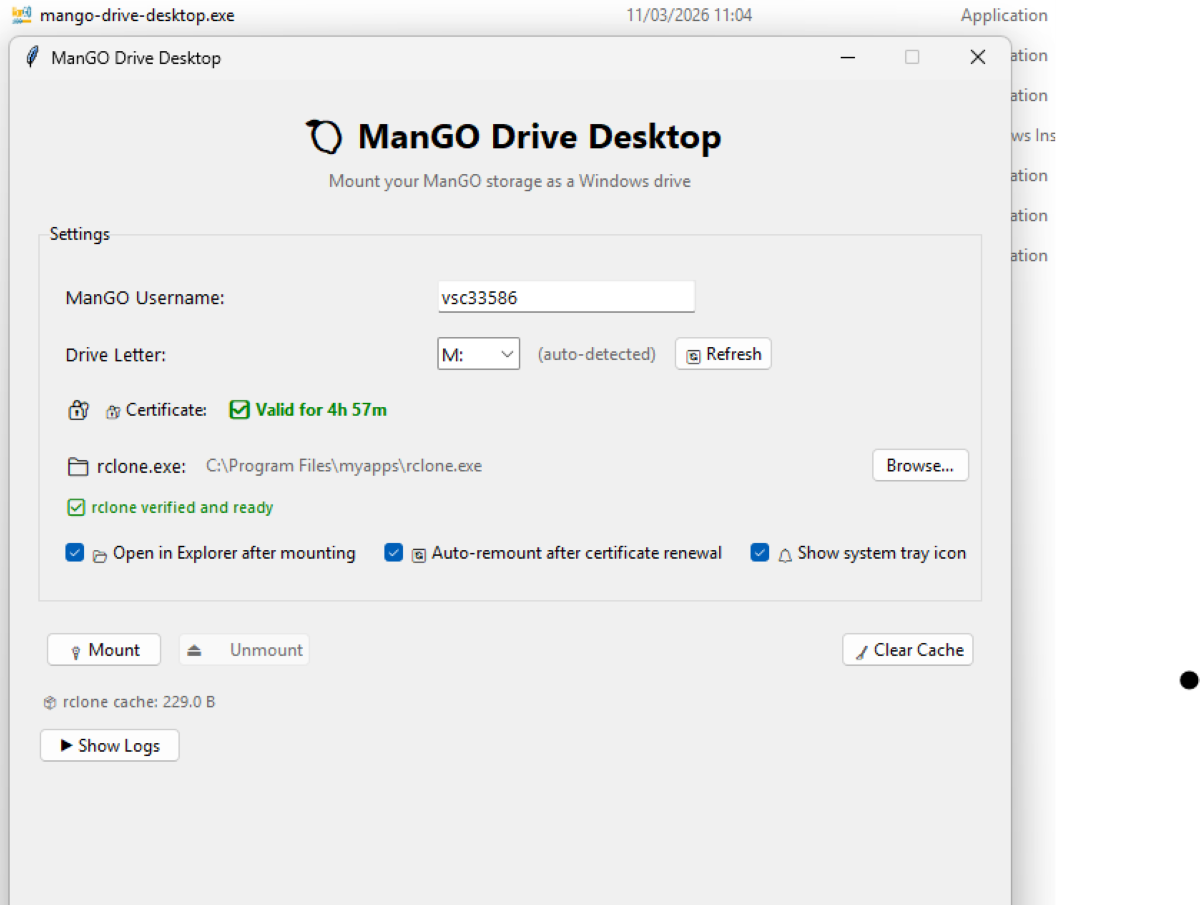
Instructions for using ManGO-drive-desktop:
- Download ManGO-drive-desktop.zip via this link and extract its content.
- Download the version of rclone.exe compatible with your system specifications from the official website at https://rclone.org/downloads/.
- Relocate the extracted ManGO-drive-desktop.exe and rclone.exe files to a directory where your group domain policy permits the execution of .exe files.
- Double-click ManGO-drive-desktop.exe to launch GUI.
- Make the necessary selections in the interface and click “Mount”.
You can now start adding, editing, deleting files in this directory with the same comfort of your Windows computer.
You don’t have to follow all these steps every time when you want to
mount your Tier-1 Data: to remount you only need to double-click
ManGO-drive.exe or ManGO-drive-desktop.exe again.
Mounting on Mac#
To mount your Tier-1 Data directories as a network drive using SFTP, you must first install the required dependency packages.
Install macFUSE (macOS 12 and later)
If your MacBook is running macOS 12 or a later version, you must first install macFUSE.
To install it via the command line:
Open your terminal.
Check if your Mac has the Homebrew package manager installed. If not, install it with:
/bin/bash -c "$(curl -fsSL https://raw.githubusercontent.com/Homebrew/install/HEAD/install.sh)"
Install macFUSE using the command:
brew install --cask macfuse
For older macOS versions:
Please contact us at rdm-icts@kuleuven.be for assistance.
Download Rclone
After successfully installing macFUSE, download the rclone utility from its official site: https://rclone.org/downloads/.
Configure and Mount Your Tier-1 Data as Drive
Follow these steps to mount the drive (except for the last command, these steps are only required once):
Move the Executable: Place the downloaded rclone program in the directory from which you want to run it.
Verify Installation: Check that the program works by running:
./rclone --help
If it does not run, you may need to remove the macOS quarantine attribute:
xattr -r -d com.apple.quarantine /path/to/your/rclone
Create Configuration: Run the configuration wizard:
./rclone config
Follow the prompts:
Use the default values for all steps (press Enter) except for the first three steps.
Step 1: Enter a name for your drive (e.g., mango_drive).
Step 2: Choose the number corresponding to SSH/SFTP.
Step 3: Enter the hostname, which you can find in the “How to connect” tab of the ManGO portal.
Create Mount Point: Create a local directory that will serve as the mount point.
mkdir mount_point
Mount the Drive: Run the following command to mount your Tier-1 Data storage locally:
rclone mount mango_drive: /path/to/your/mount_point --vfs-cache-mode full --allow-non-empty
To verify the connection was successful, open ‘Finder’ and look for the Tier-1 Data service mounted as a network drive under the name ‘mango_drive’.