Data transfer on Mac#
Prerequisite: OpenSSH, Cyberduck or FileZilla#
macOS comes with its own implementation of OpenSSH, so you don’t need to install any third-party software to use it. Just open a Terminal window and jump in! Because of this, you can use the same scp and sftp commands as in Linux to access the cluster and transfer files.
We recommend Cyberduck as a graphical alternative to the scp command. This program is freely available (with a voluntary donation) from the Cyberduck web site and easy to use. Installation is easy: just drag the program’s icon to the Application folder in the Finder, and you’re done. The program can also be found in the App Store but at a price.
An alternative SFTP GUI is FileZilla. FileZilla for macOS is very similar to FileZilla for Windows (see also our page about FileZilla in the Windows section). you can download FileZilla.
Transferring files with Cyberduck#
Files can be easily transferred with Cyberduck. Setup is easy:
After starting Cyberduck, the Bookmark tab will show up. To add a new bookmark, click on the ‘+’ sign on the bottom left of the window. A new window will open.
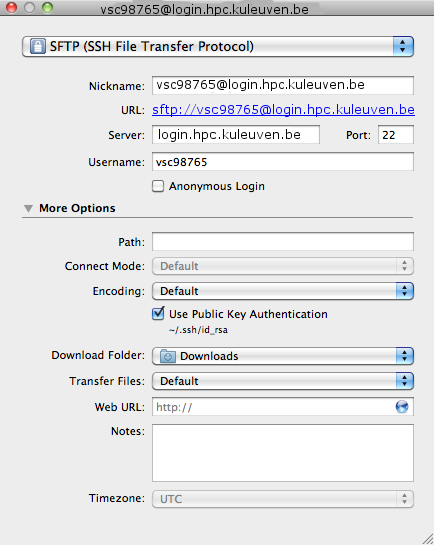
In the ‘Server’ field, type in <vsc-loginnode>. In the ‘Username’ field, type in your <vsc-account>.
Click on ‘More Options’, select ‘Use Public Key Authentication’ and point it to your private key (the filename will be shown underneath). Please keep in mind that Cybeduck works only with passphrase-protected private keys.
Finally, type in a name for the bookmark in the ‘Nickname’ field and close the window by pressing on the red circle in the top left corner of the window.
To open the scp connection, click on the ‘Bookmarks’ icon (which resembles an open book) and double click on the bookmark you just created.
Transferring files with FileZilla#
To install FileZilla, follow these steps:
You can download FileZilla (take care to download the version for your operating system) for the FileZilla project page.
The file you just downloaded is a compressed UNIX-style archive (with a name ending on .tar.bz2). Doubleclick on this file in Finder (most likely in the Downloads folder) and drag the FileZilla icon that appears to the Applications folder.
Depending on the settings of your machine, you may get notification that Filezilla.app cannot be opened because it is from an unidentified developer when you try to start it. Check out the macOS Gatekeeper on this Apple support page.
FileZilla for macOS works in pretty much the same way as FileZilla for Windows:
start FileZilla;
open the ‘Site Manager’ using the ‘File’ menu;
create a new site by clicking the New Site button;
in the tab marked General, enter the following values (all other fields remain blank):
Host: login.node.vsc (replace with the name of the login node of your home cluster)
Servertype: SFTP - SSH File Transfer Protocol
Logon Type: Normal
User: your own VSC user ID, e.g., vsc98765;
optionally, rename this setting to your liking by pressing the ‘Rename’ button;
press ‘Connect’. Enter your passphrase when requested. FileZilla will try to use the information in your macOS Keychain. See the page on “Text-mode access using OpenSSH” to find out how to add your key to the keychain using
ssh-add.

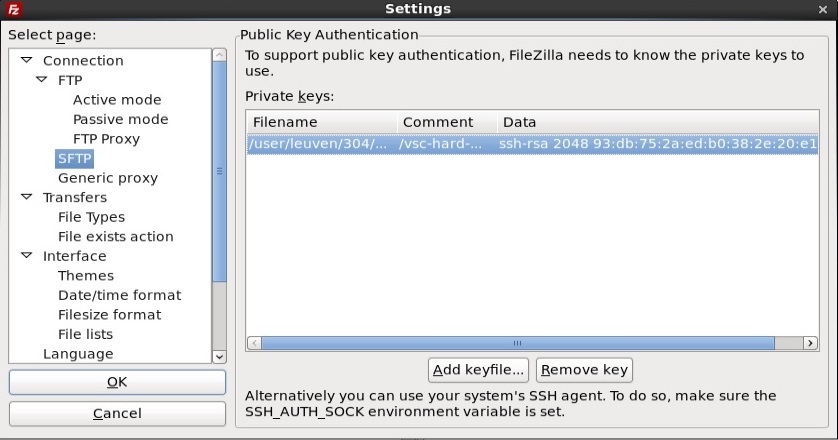
Note that recent versions of FileZilla have a screen in the settings to manage private keys. The path to the private key must be provided in options (Edit Tab -> options -> connection -> SFTP):
After that you should be able to connect after being asked for passphrase. As an alternative you can choose to use the built-in macOS keychain system.
Terminal tools#
Alternatively, you can use command line tools such as scp and sftp.