1. Metadata schemas in the ManGO portal#
This article describes the ManGO portal functionalities related to metadata schemas: how to design them and how to apply them. Users who might want to design their own schemas independently and load them via JSON, as well as developers interested in implemented this feature outside the portal, are directed to the technical specifications.
One crucial principle of the metadata schema functionality in the ManGO portal is that schemas that can be used to apply metadata cannot be modified. In other words, for a schema to be used in metadata annotation it must be fixed and stable; a schema that is undergoing changes cannot reliably be used for annotation. However, during the course of a research project it might be necessary to update a schema, and it would be impractical to create whole new schemas with different names for every such change. In order to tackle this issue, the ManGO portal implements a lifecycle via versioning and tags. In short, a schema can evolve and its evolutions can be registered as new versions of the same schema. Each version can have one of three statuses: (1) ‘draft’, while it is being designed and edited; (2) ‘published’, when it is ready to be implemented; and (3) ‘archived’, when it should not be used anymore, maybe because a new version has been published.
In this context, the rest of this document will walk you through the process of creating, managing and applying metadata schemas. First, Section 1 will illustrate how to design a new schema from scratch and save a draft. Then, Section 2 will briefly discuss the stages of a schema in more detail, including how they can be managed in the Metadata Schema Manager (the “Metadata schemas” tab in the ManGO portal). Finally, Section 3 will show how a published schema can be used to annotate metadata.
1.1. Schema design#
1.1.1. New schema creation#
In order to design a new schema, we need to go to the Metadata schemas section via the left sidebar menu. This will first show a selection of projects, so-called realms, to which your schemas may belong. After choosing one, the schema manager will open:
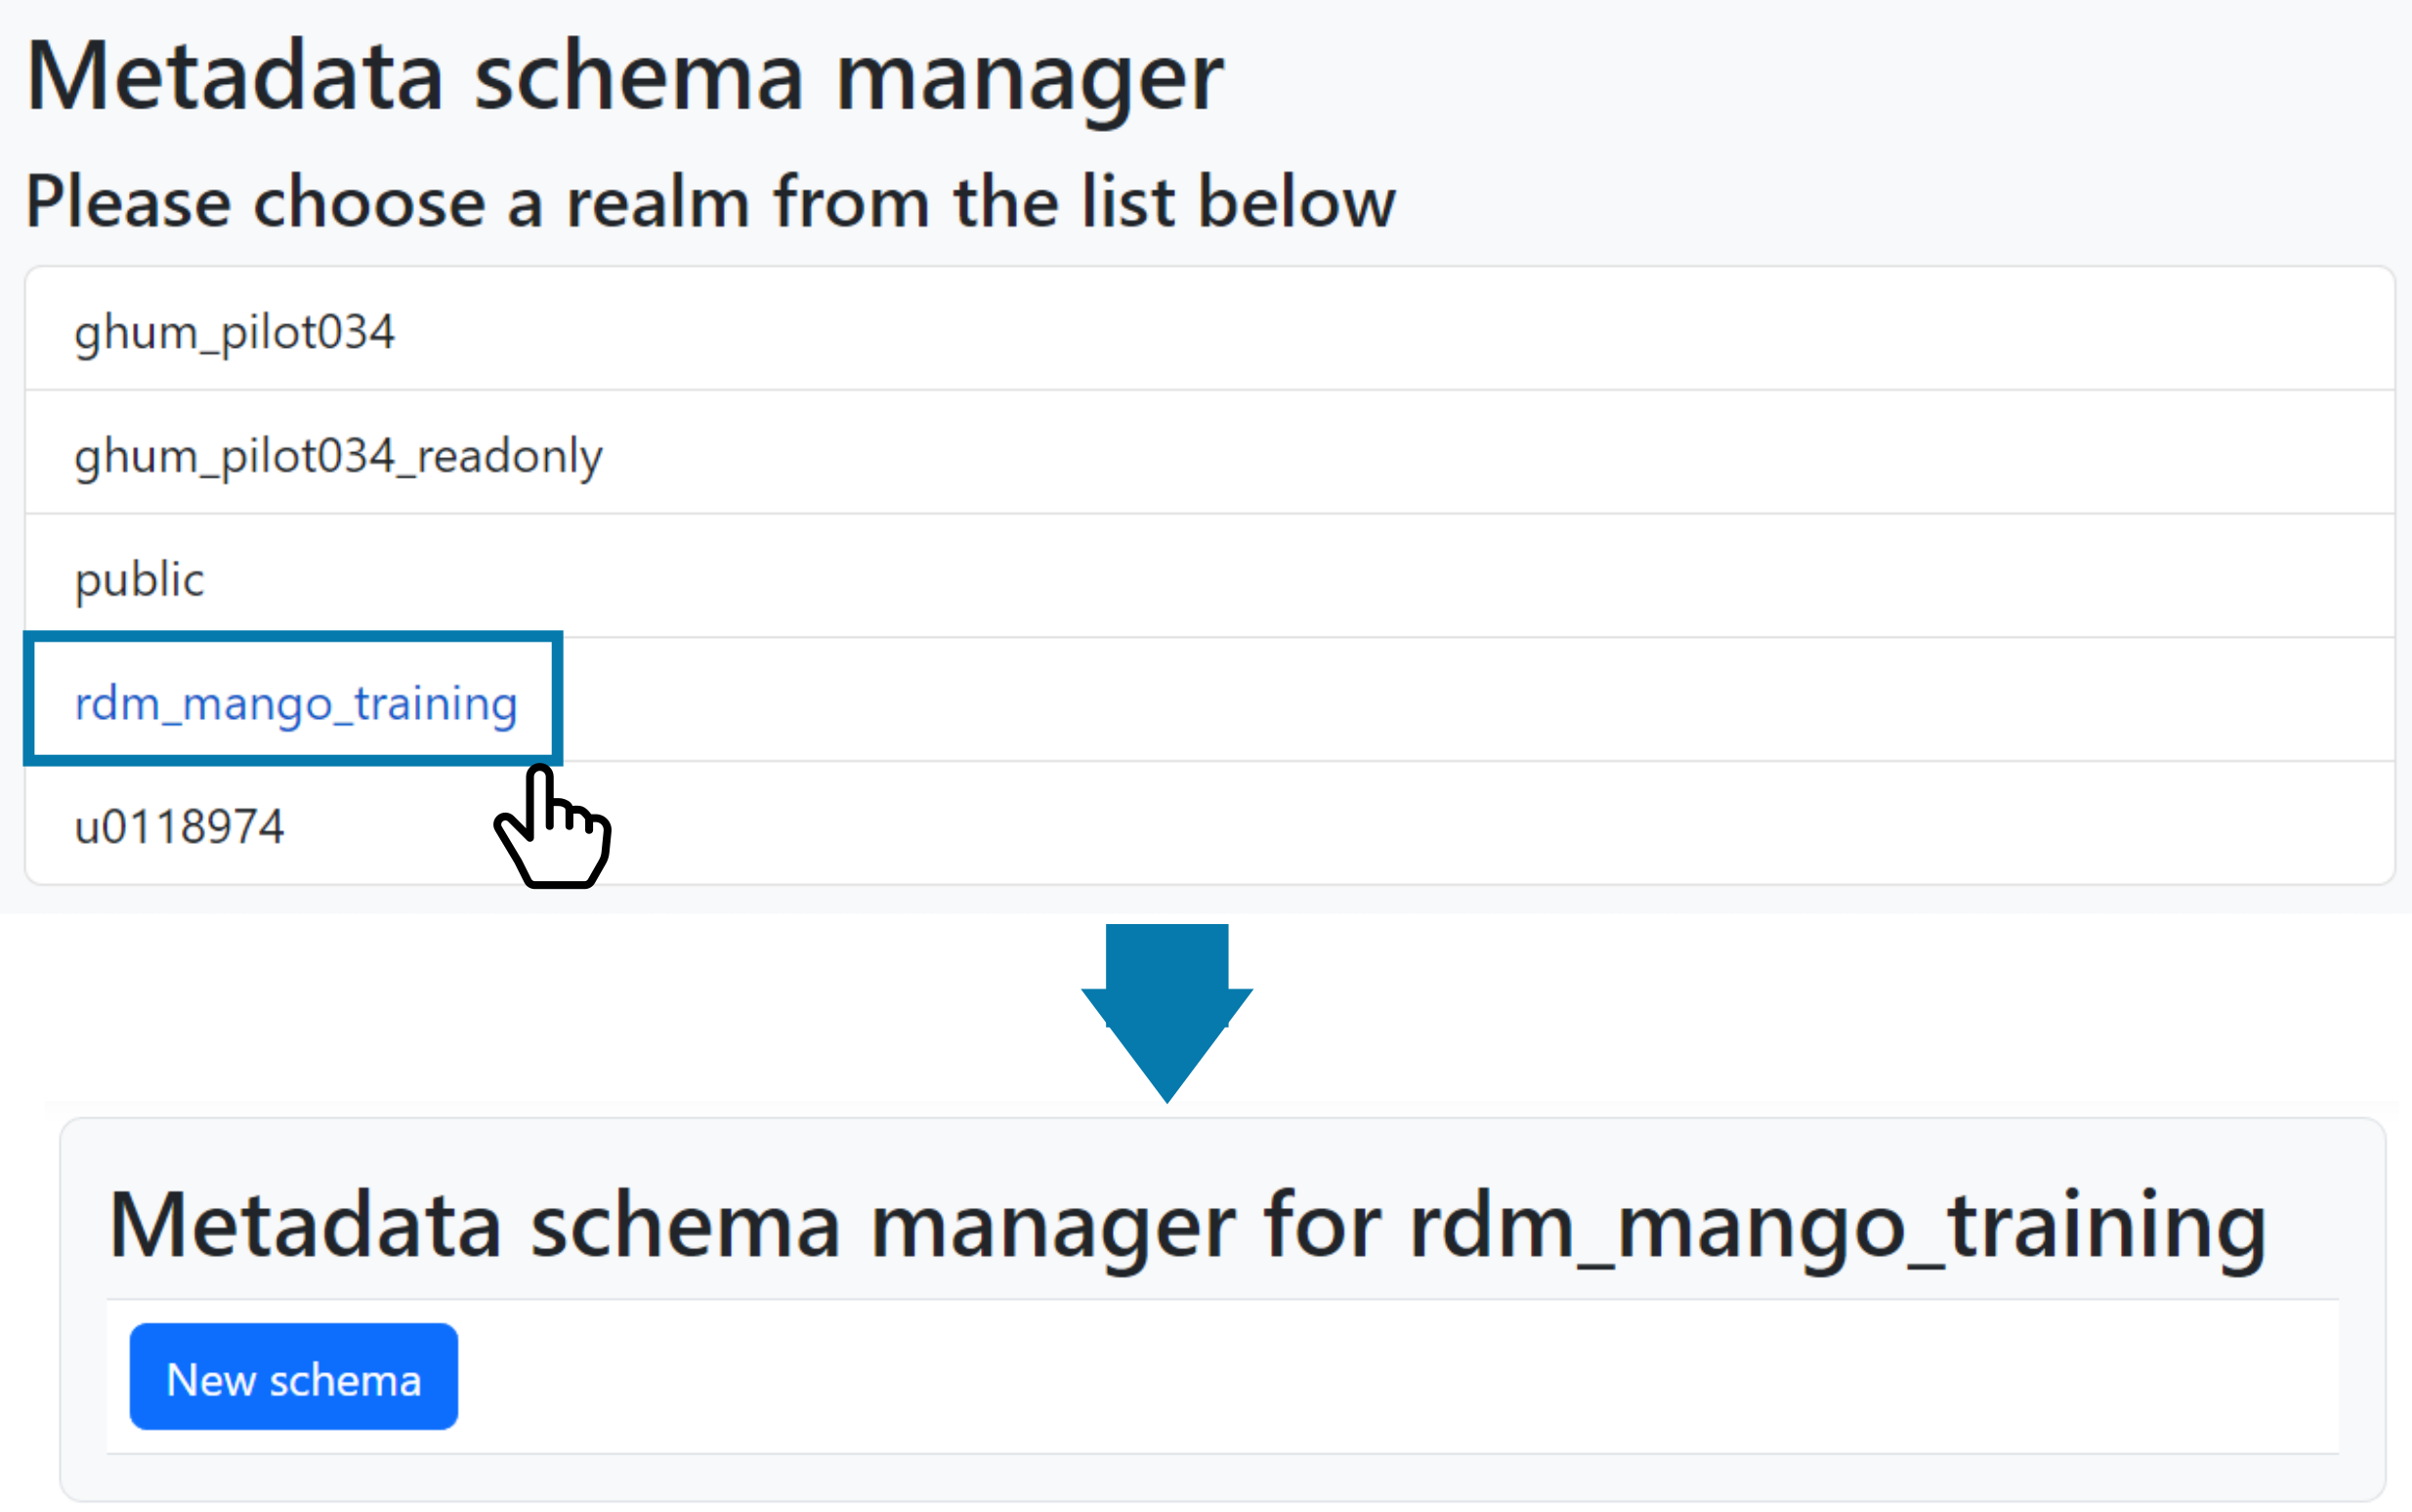
Fig. 1.1 Choose a realm for new schema.#
Any existing schemas will be listed under the New schema button. Click the New schema button to add a new schema. A new panel will open to define the new schema. It includes a field to provide a name, one for a user-facing title and a button to add a field:
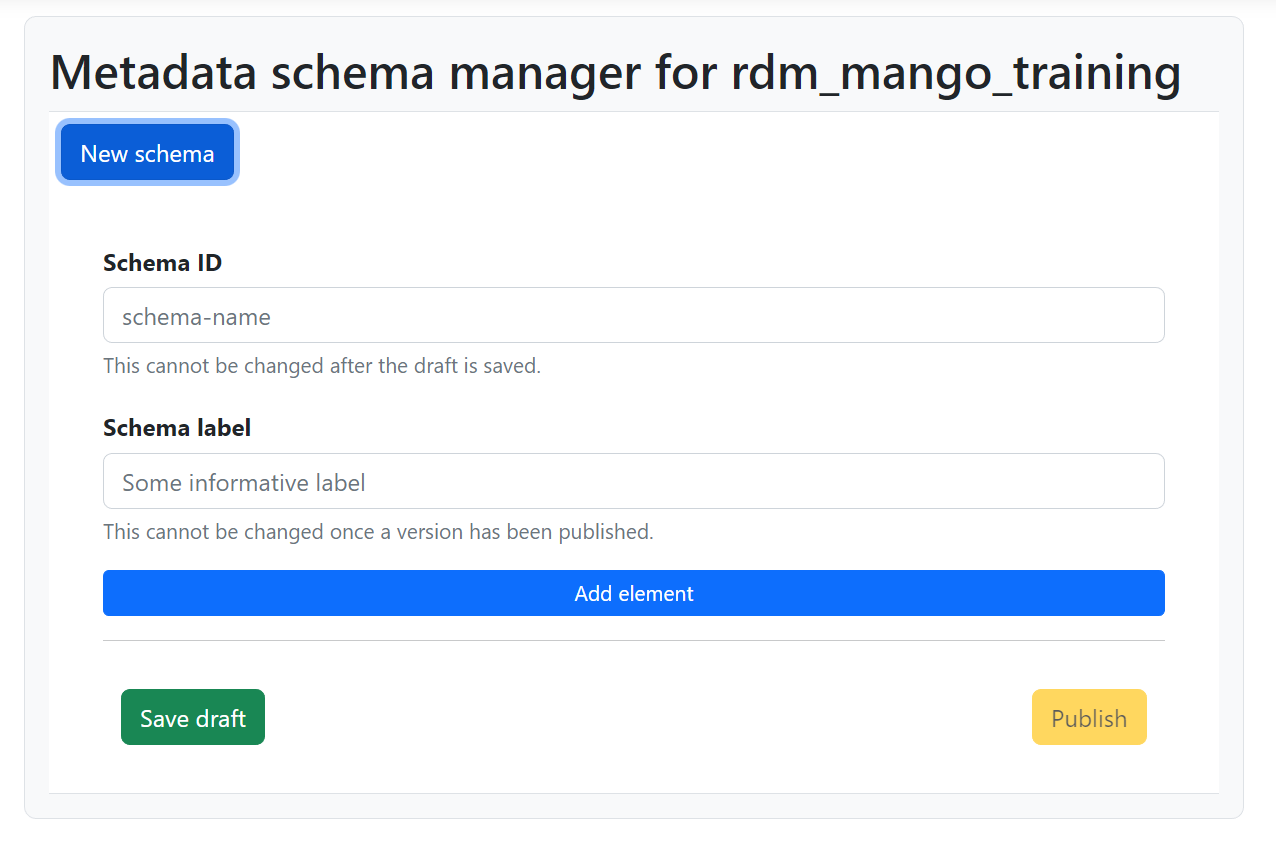
Fig. 1.2 Empty definition of new schema.#
The Schema ID field is meant for the unique ID or name of a schema and, like
the Schema label, is shared by all the versions of the same schema. The given
ID of the schema will prefixed to all attribute names of its metadata fields.
For instance, an schema with ID book will have attributes with the form
mgs.book..
Therefore some restrictions apply to the format of the ID: it can only contain
lowercase letters, numbers, hyphens and underscores. In contrast, the label can
be any type of name or title and will be used to represent the schema in
user-facing interactions, as will be shown later. In the following, we will
exemplify with a schema named book with the label “Book schema as an
example”.
1.1.2. Schema elements#
The button Add element in Fig. 1.2 opens a modal that offers the different kinds of fields that can be added to a schema:
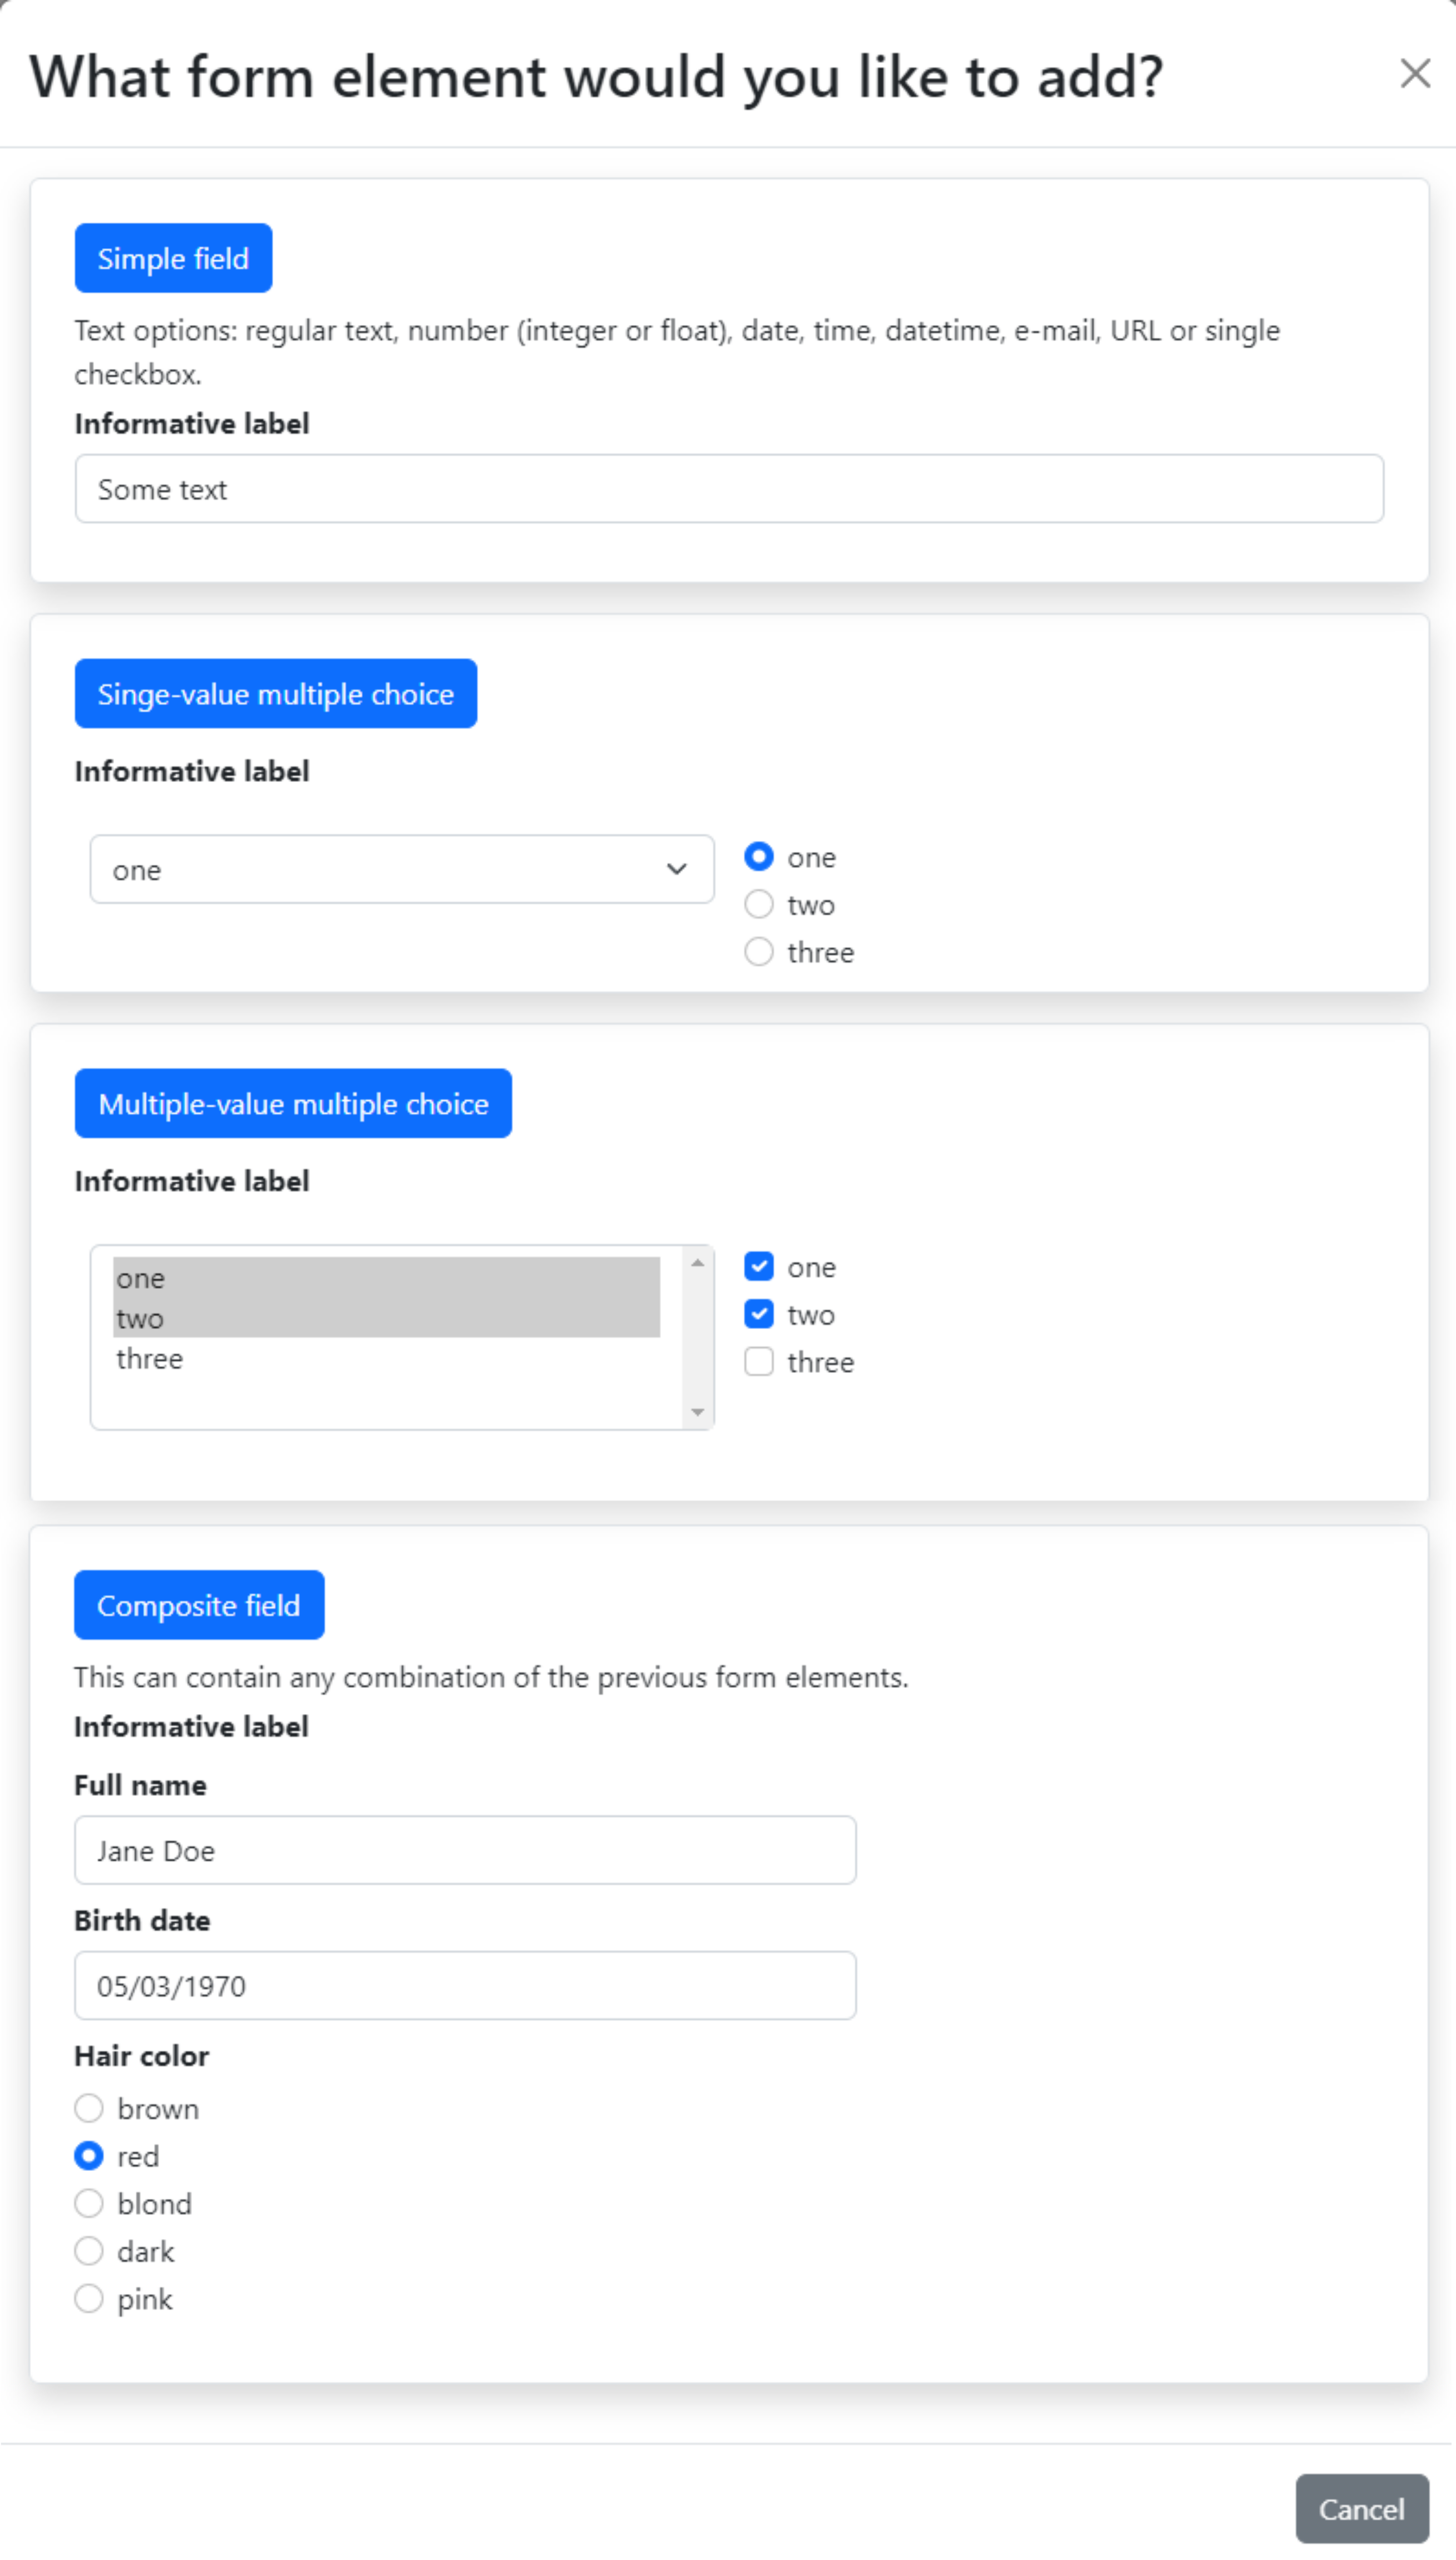
Fig. 1.3 Options to select a type of input field.#
The blue buttons with the names of the types of fields open new modals with forms that can be used to design an instance of this field:
- Simple fields
Generate input fields for texts, numbers, dates and similar formats or a single checkbox.
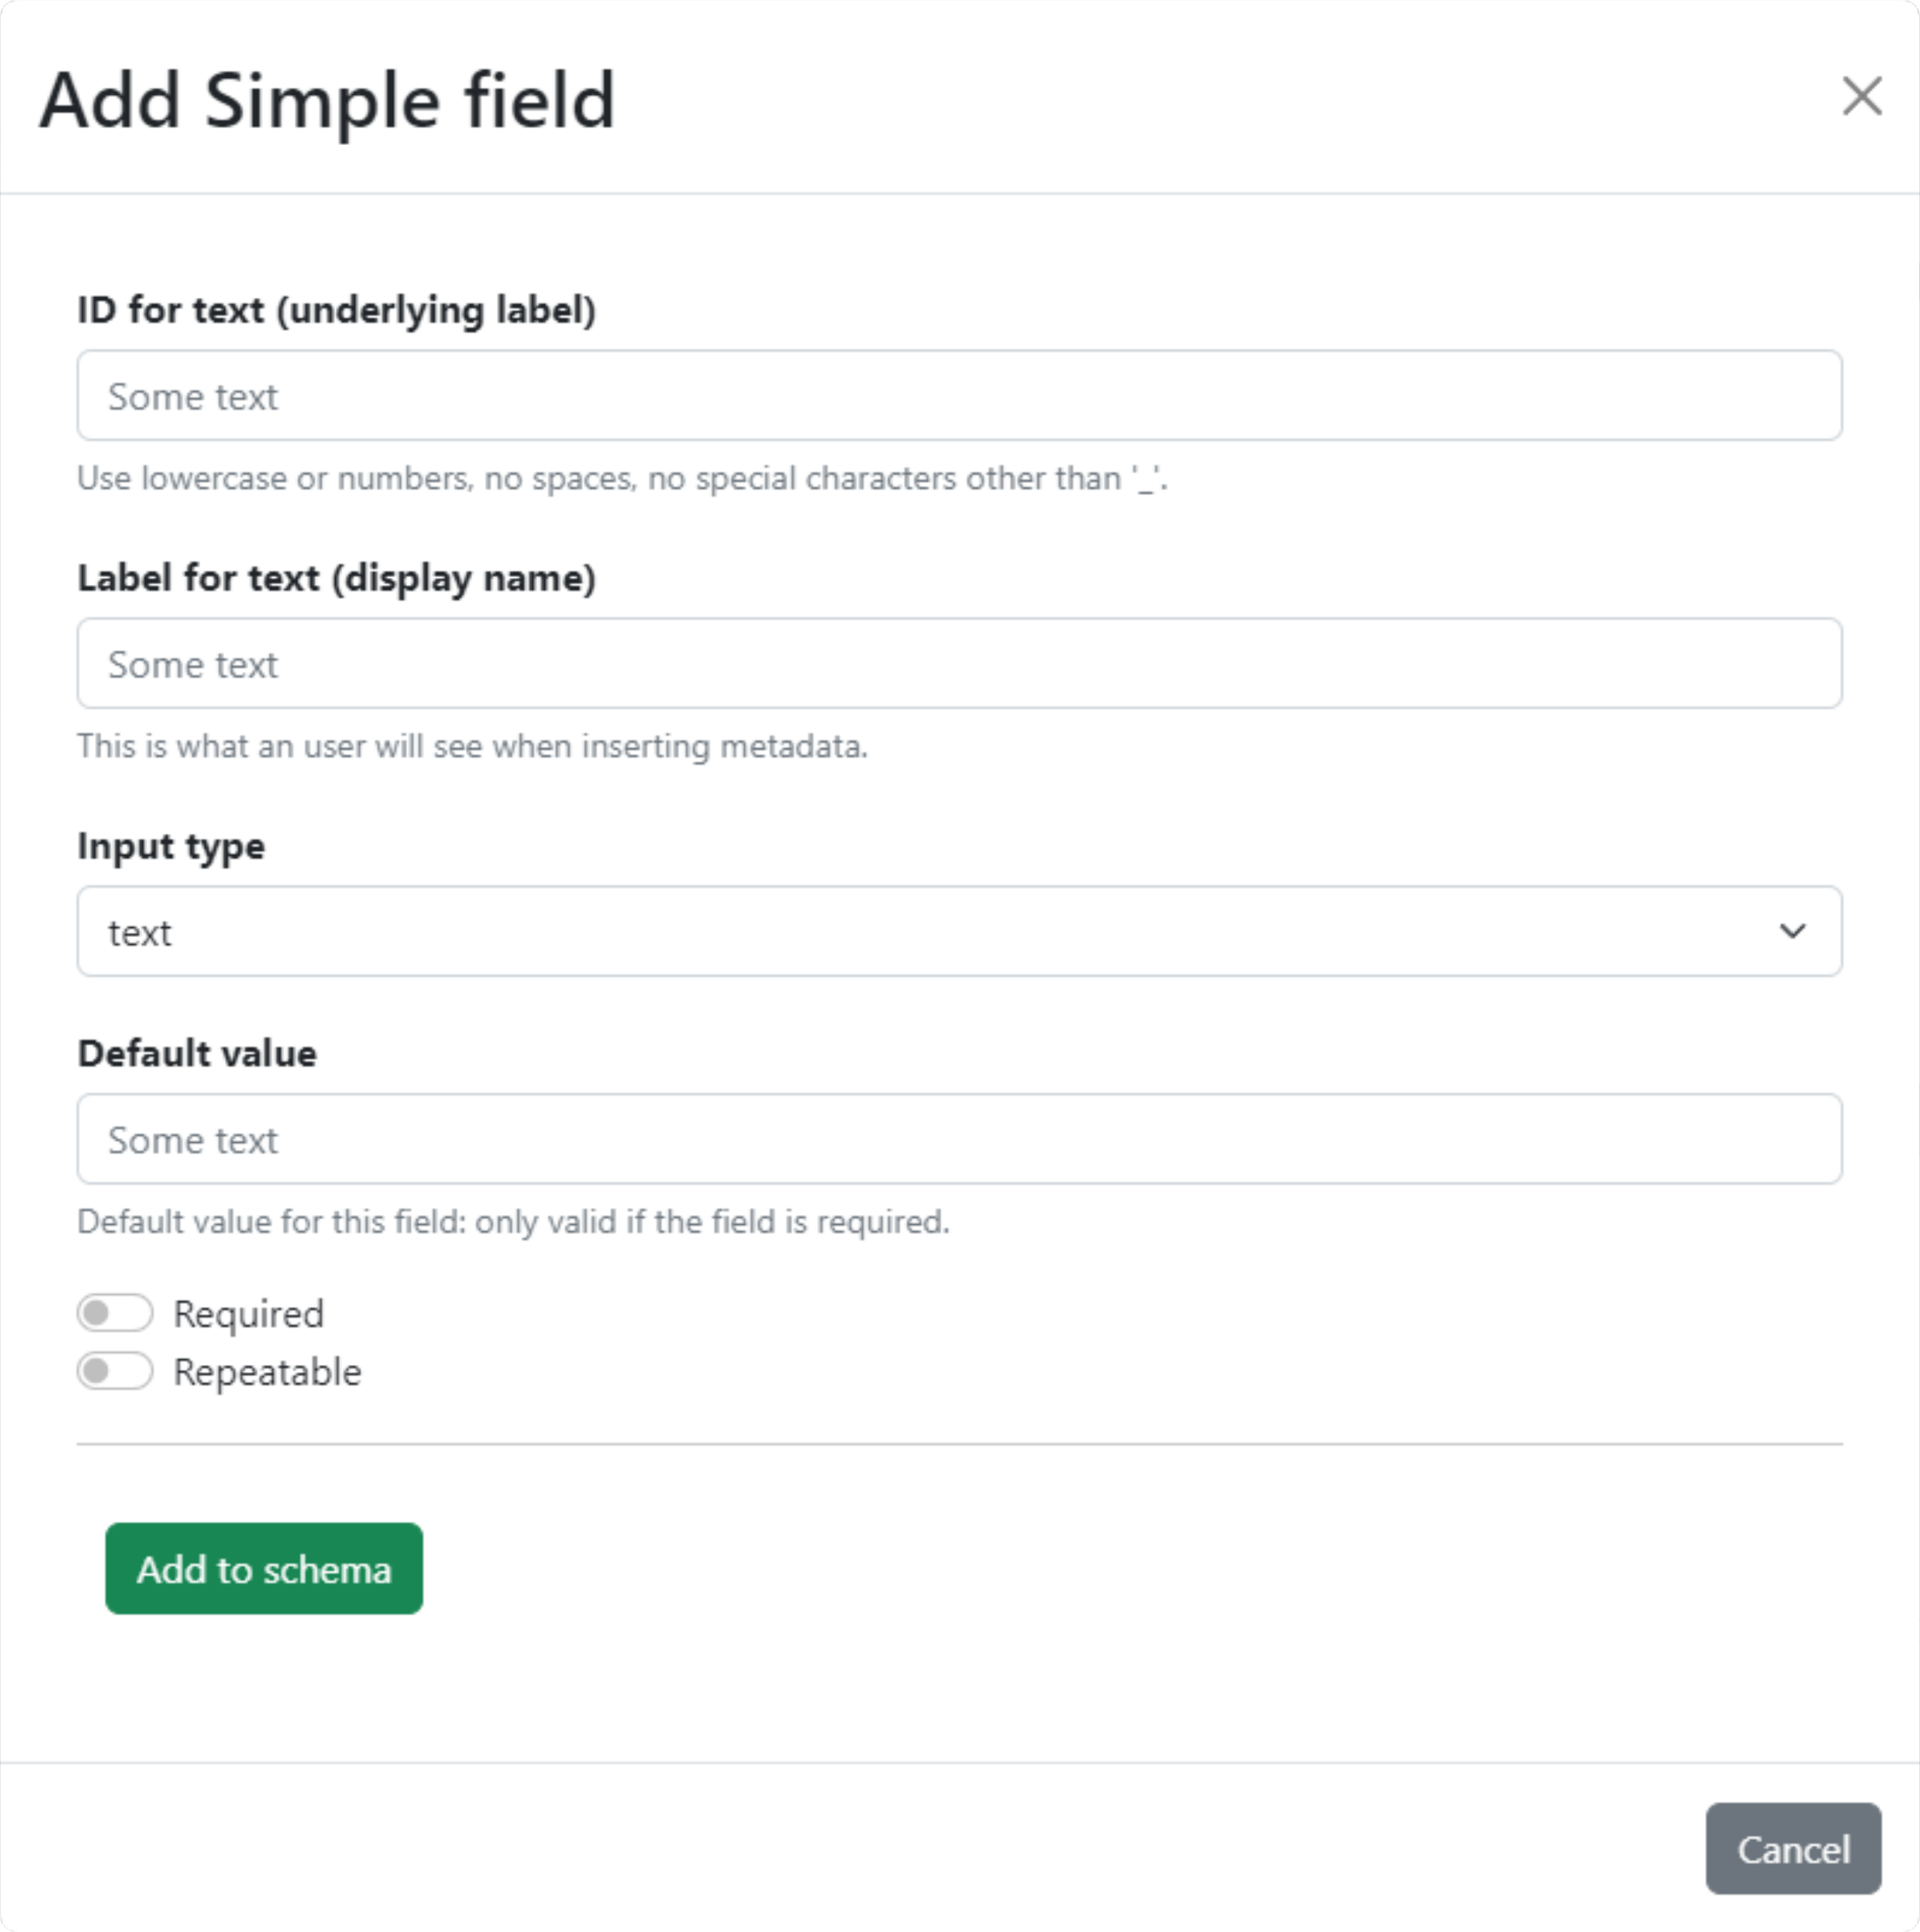
Fig. 1.4 Design a simple field.#
- Single-value multiple choice
Generate dropdown menus or radio buttons and are used when the metadata value must be one of a selection of possible values.
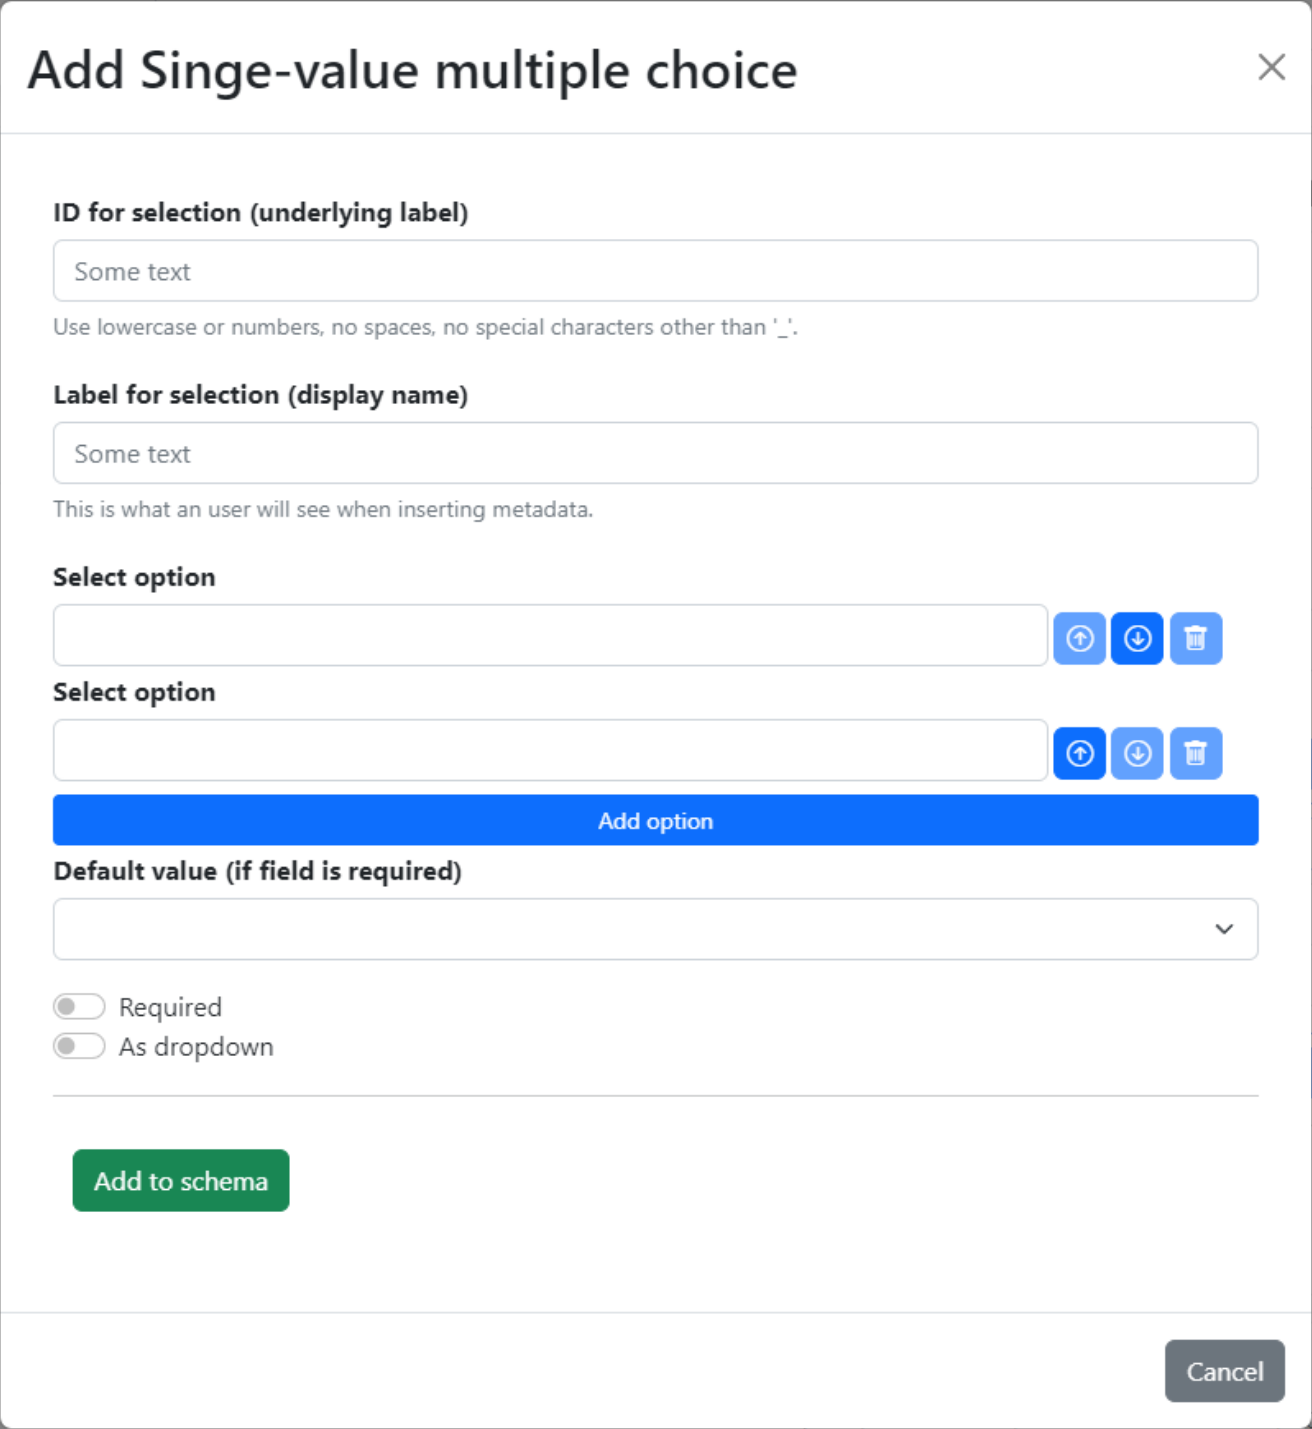
Fig. 1.5 Design a single-value multiple-choice field.#
- Multiple-value multiple choice
Generate dropdown menus or checkboxes and are used when the metadata value may be many of a selection of possible values. As a result, the same attribute name is repeated with different attribute values.
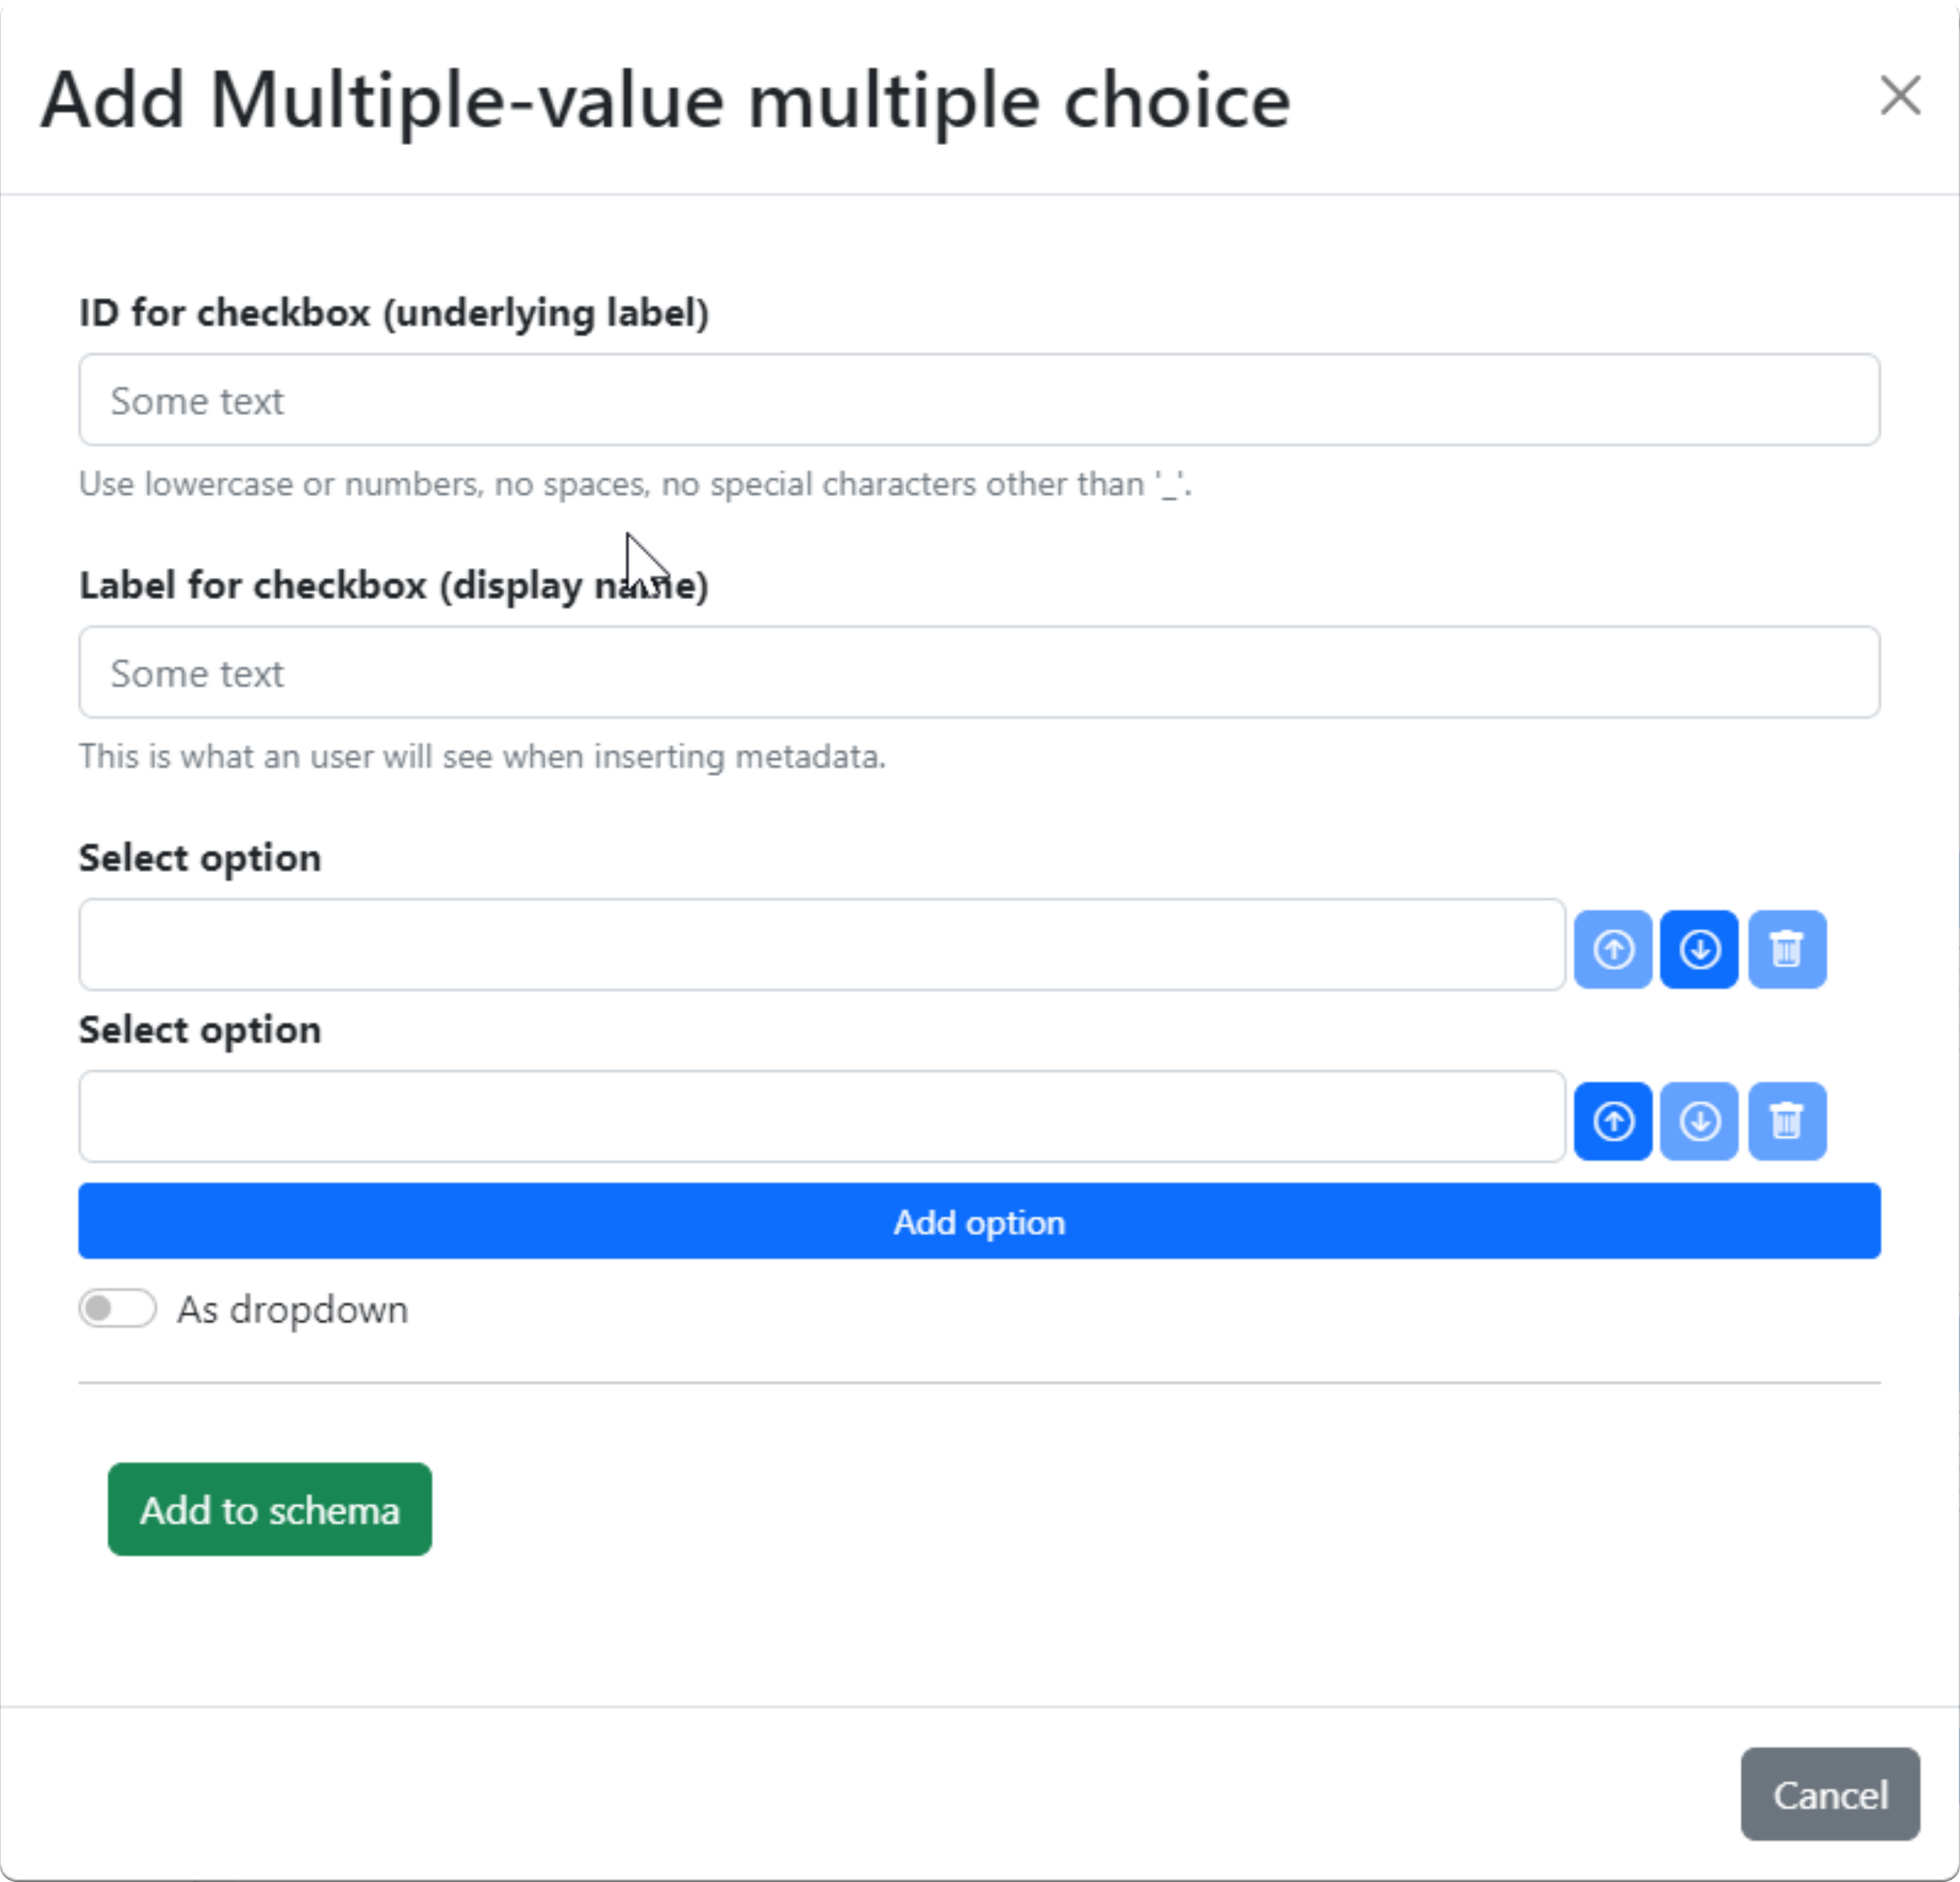
Fig. 1.6 Design a multiple-value multiple-choice field.#
- Composite field
Group other kinds of fields that describe the same concept. Similar to nested schemas.
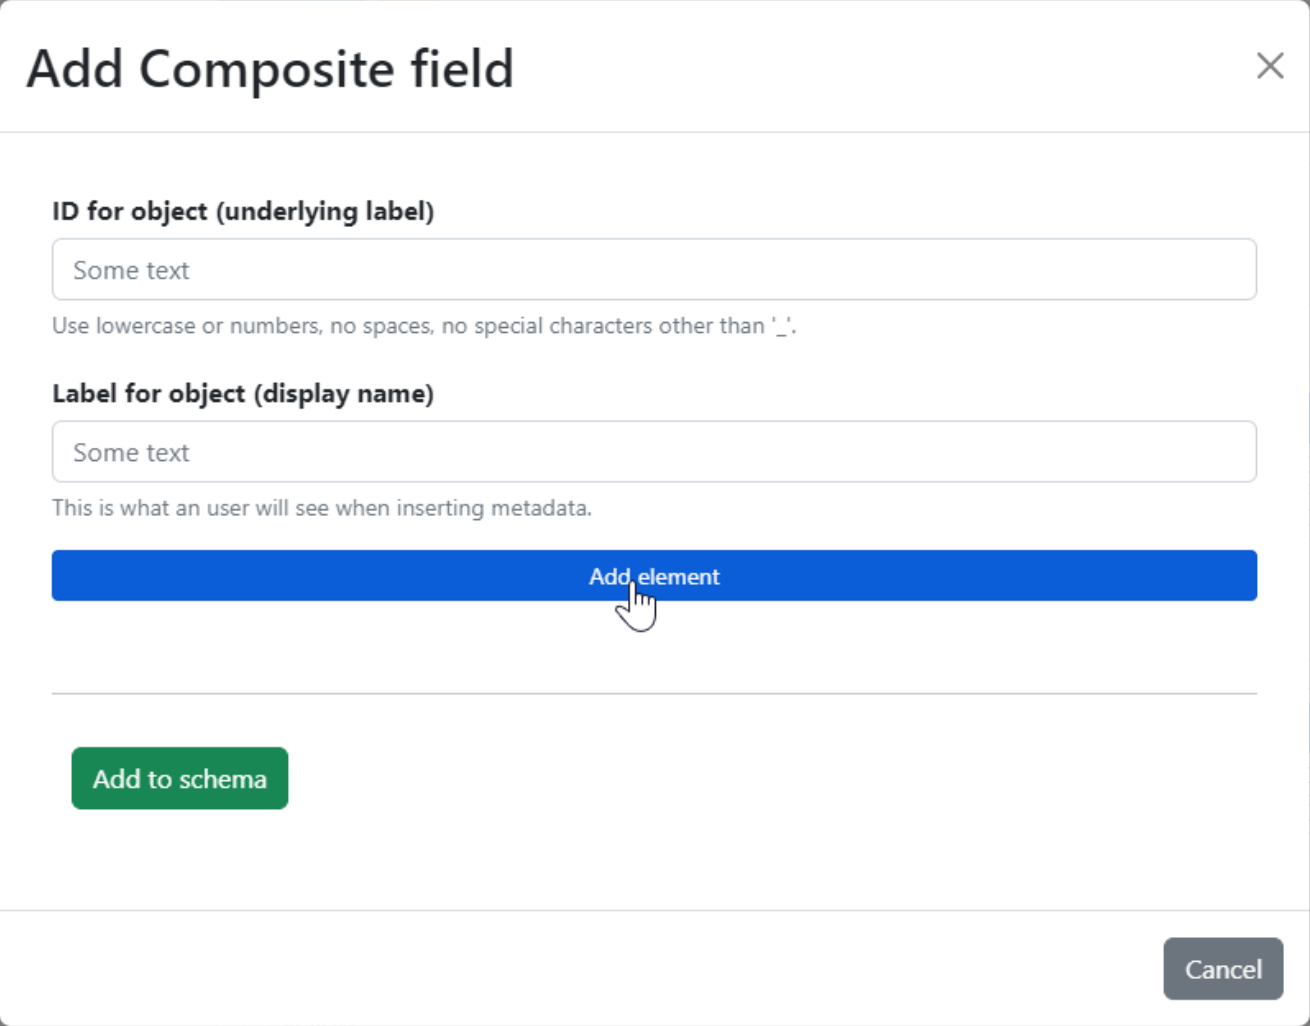
Fig. 1.7 Design a composite field.#
All these forms start with two text fields to define an ID and a label for the field and end with a button to add the new field to the schema. In between there are more specific input fields used to refine the characteristics of the field you want to design as well as up to two switch buttons to implement optional properties.
1.1.3. Simple field example#
As an example, we will illustrate the creation of a new simple field. Clicking on Simple field will open the form in Fig. 1.4. After the common fields for ID and label, we see a dropdown menu that offers different kinds of simple fields: text, textbox, email, url, integer, float, date, time, datetime… If integer or float are chosen, two new fields will appear to define minimum and maximum thresholds for the value of the field.
The Required switch at the bottom the panel will make this field mandatory, i.e. when filling in the metadata, this field will have to be provided. In such a case, we can also provide a default value.
The Repeatable switch allows to create multiple instances of this field, i.e. when filling in the metadata, multiple copies with the same attribute name but different values will be allowed.
Fig. 1.8 shows the same form as Fig. 1.4 after
filling in some choices. The chosen ID is title, which means that when
applying the schema this will create an attribute name mgs.book.title. The
label is Book title, so that the form to apply the metadata schema and the
table used to inspect the existing metadata will show this label. The field is
also required, but has no default value, and of type text.
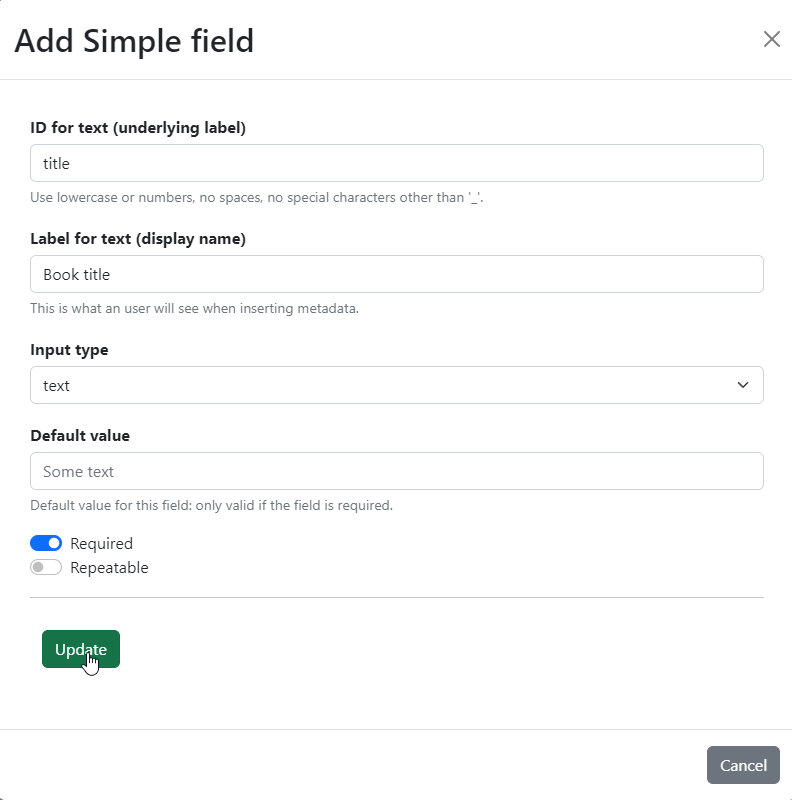
Fig. 1.8 Example filled-in form for a simple field.#
Once we add this new field to the schema, a box for it is added to the schema editor:
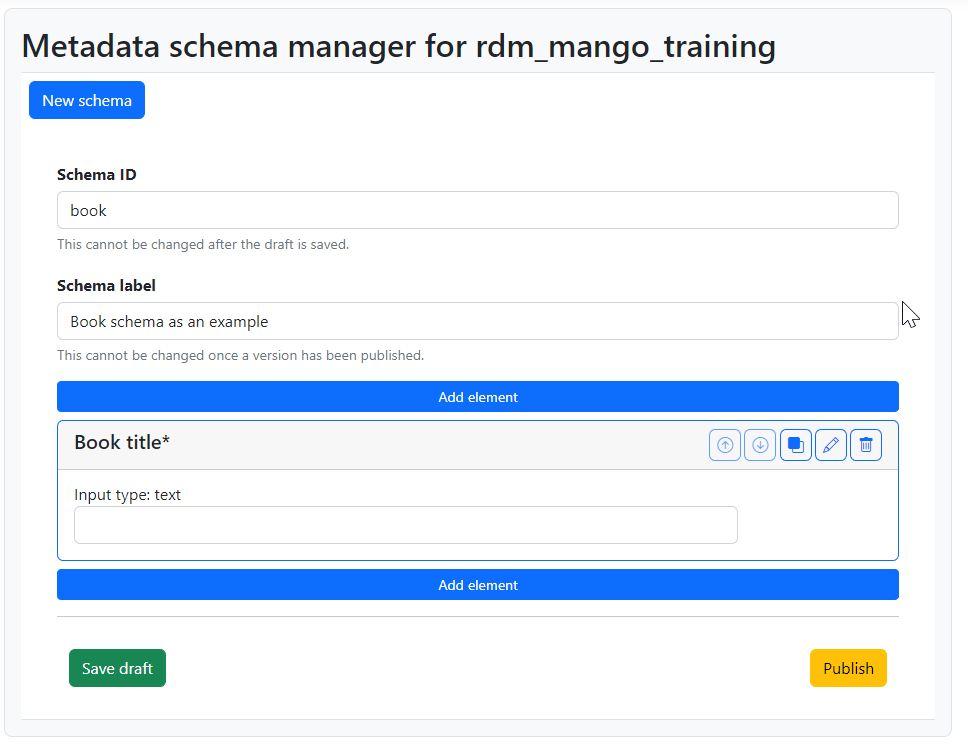
Fig. 1.9 View of a designed simple field.#
The new field added to this example schema is shown by its title –but not the ID–. The asterisk after the title indicates that the field is required. Underneath we see the input field as it would look like in the final form with a small clarification of the type of input field it is.
The top right corner of the box has some options to further manipulate the field and its position in the form. The arrows allow us to move the field up and down, but they are disabled at the moment because there are no other fields in this schema. The third button creates a quick copy of the field as an aid to create a similar one. The pencil reopens the editing modal if you want to change anything in the field, and the trash bin can be used to delete the field altogether.
You can also see in Fig. 1.9 that the box representing the new field now has two Add element buttons: one to add a field right before, and the other to add a field right after. Clicking one of these buttons will open again the modal shown in Fig. 1.3 and we can choose again the type of field we want to add.
1.1.4. Multiple-choice fields example#
As seen in the Schema elements, the only differences between the single-value multiple-choice (Fig. 1.5) and the multiple-value multiple-choice fields (Fig. 1.6) are the title of the modal and the possibility of defining a default value or not. However, the resulting elements have significant differences.
Single-value multi-choice fields will rendered as radio buttons by default, whereas multiple-value ones will be rendered as checkboxes. In both case the input field will look like a dropdown menu whenever the As dropdown switch is activated (see Fig. 1.10). However, the number of options that can be selected from it depend on whether it is created as a single-value or multiple-value field.
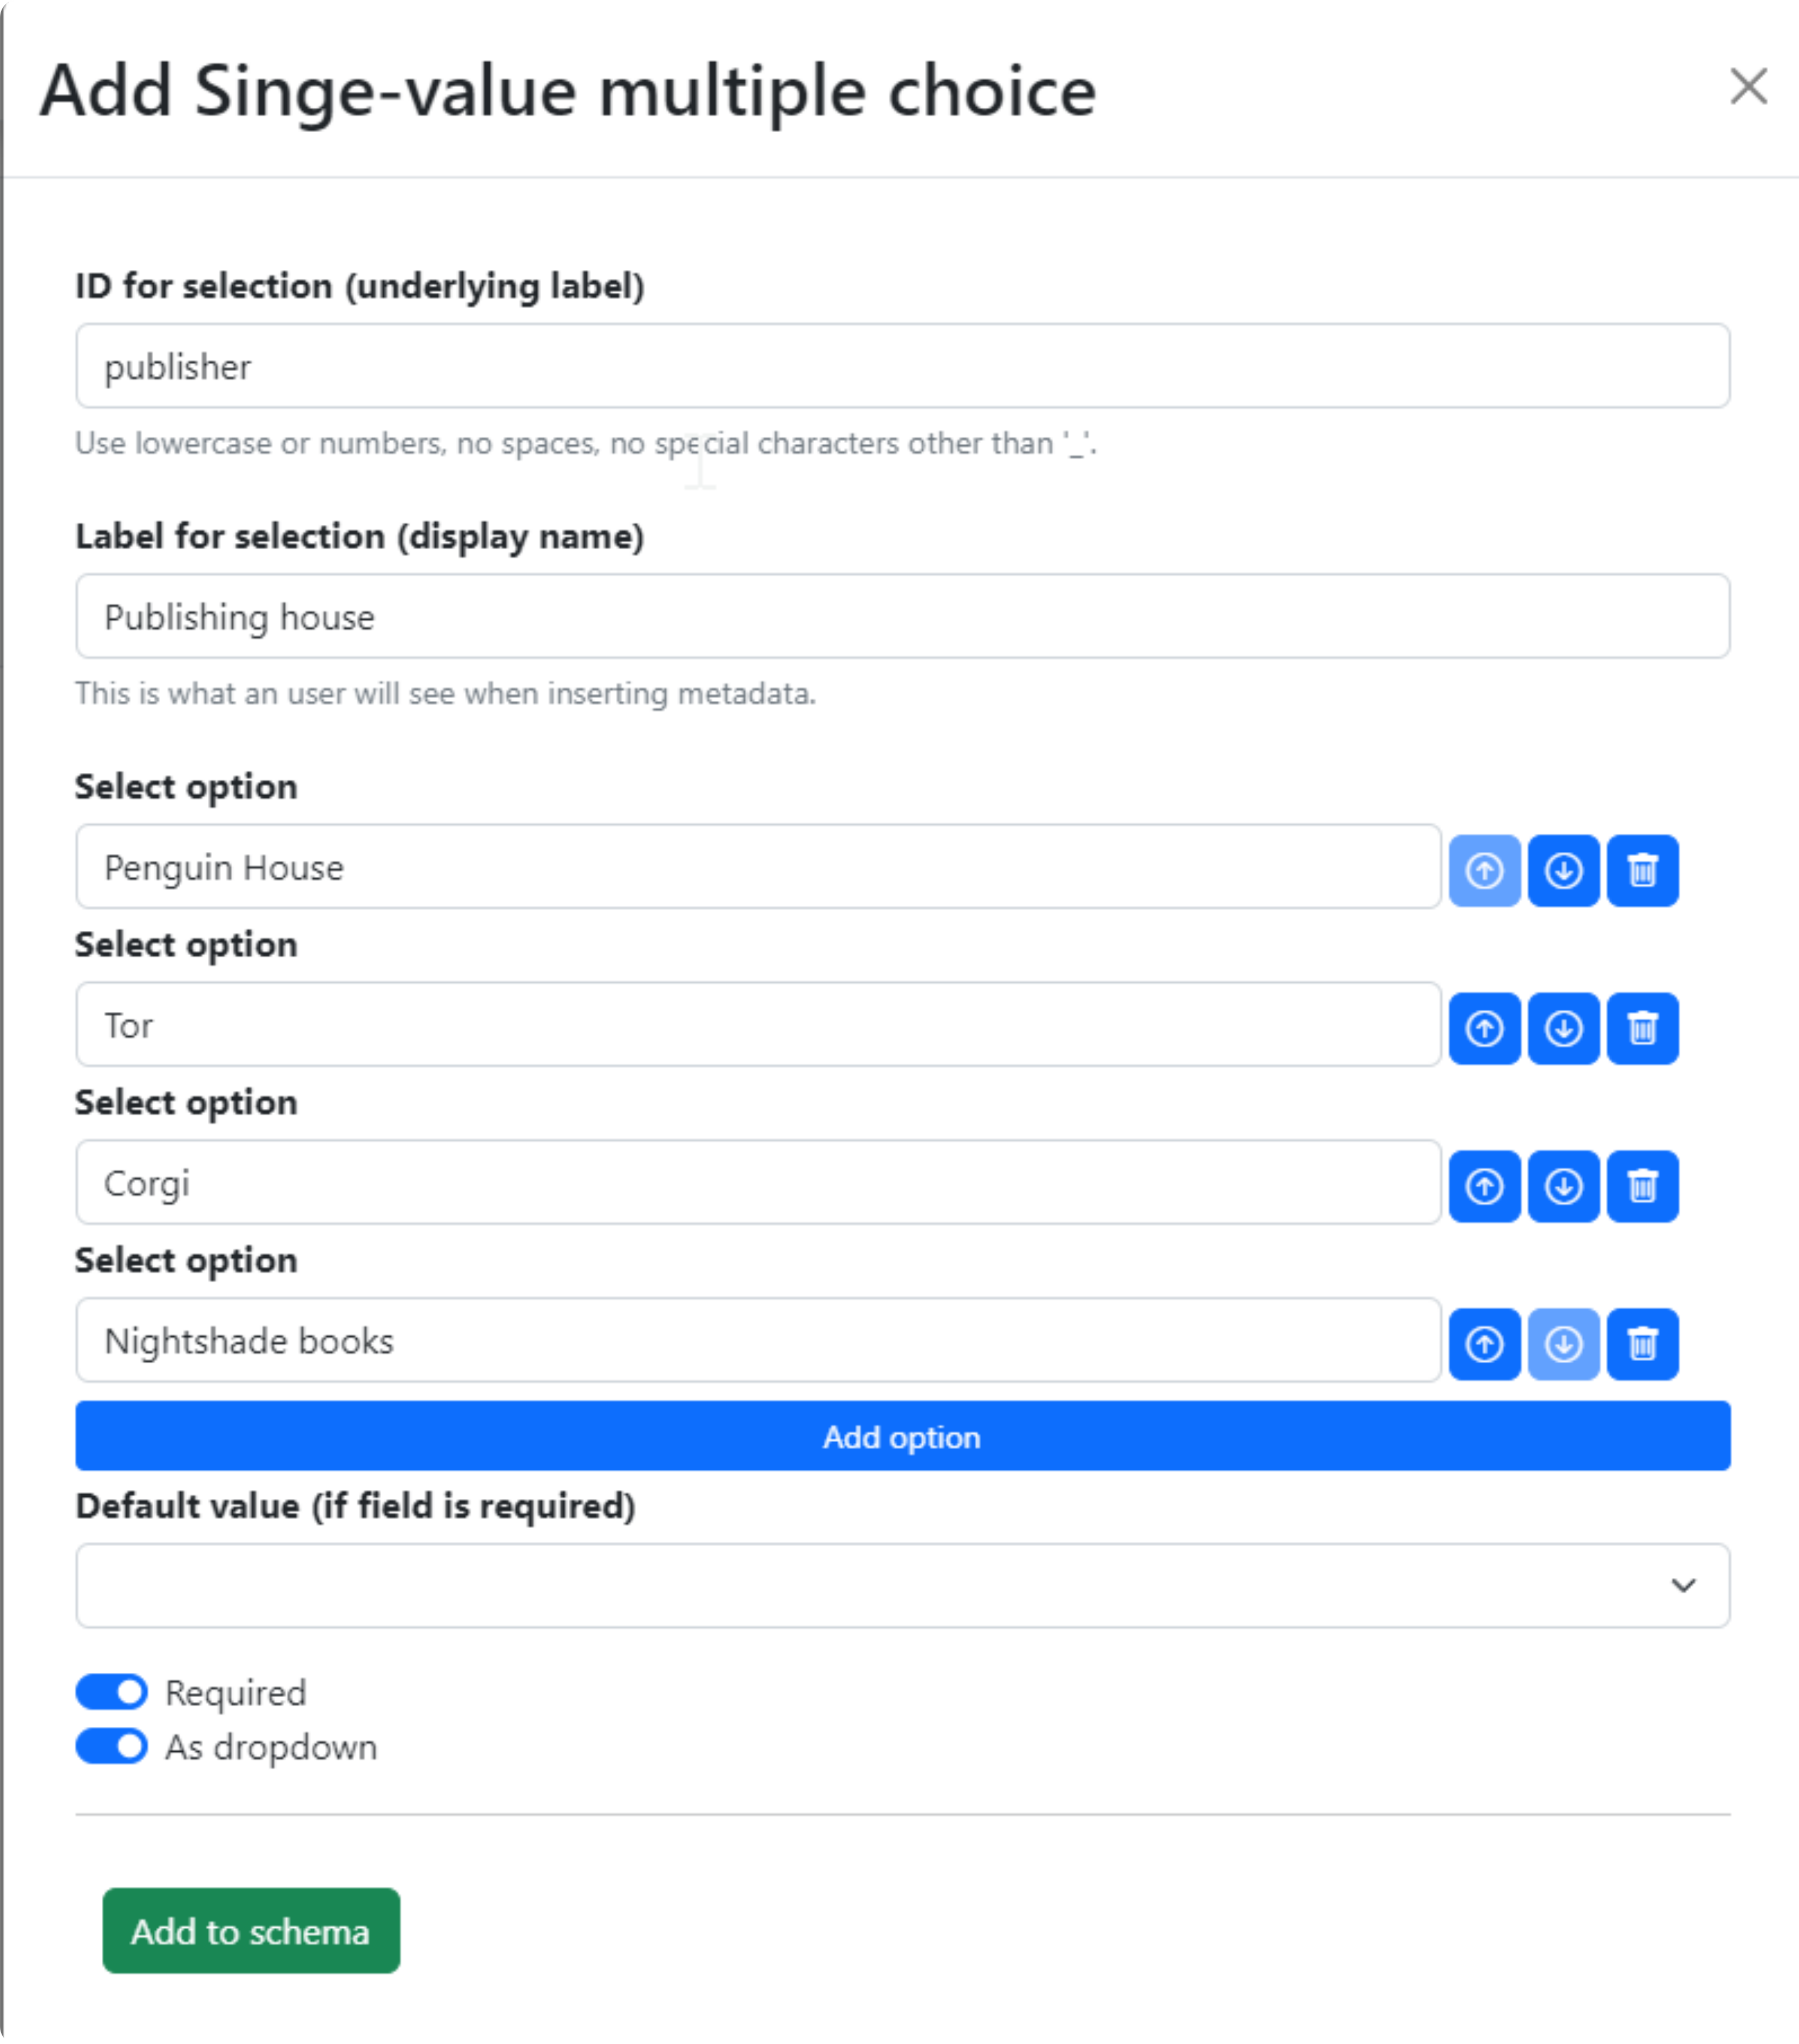
Fig. 1.10 Example filled-in form for a single-value multiple-choice field.#
In both cases, the editor of options in Fig. 1.5 and Fig. 1.6 work in the same way. We start with two empty fields labeled Select option with three buttons to their right: two arrows and a trash bin. The arrows allow us to reorder the options, whereas the trash bin lets us remove one of the fields (there cannot be fewer than two). The big Add option button creates a new input field for a new option, which must be either filled or deleted.
Once the new multi-choice field defined in Fig. 1.10 is added to the schema, it will be previewed in the schema editor:
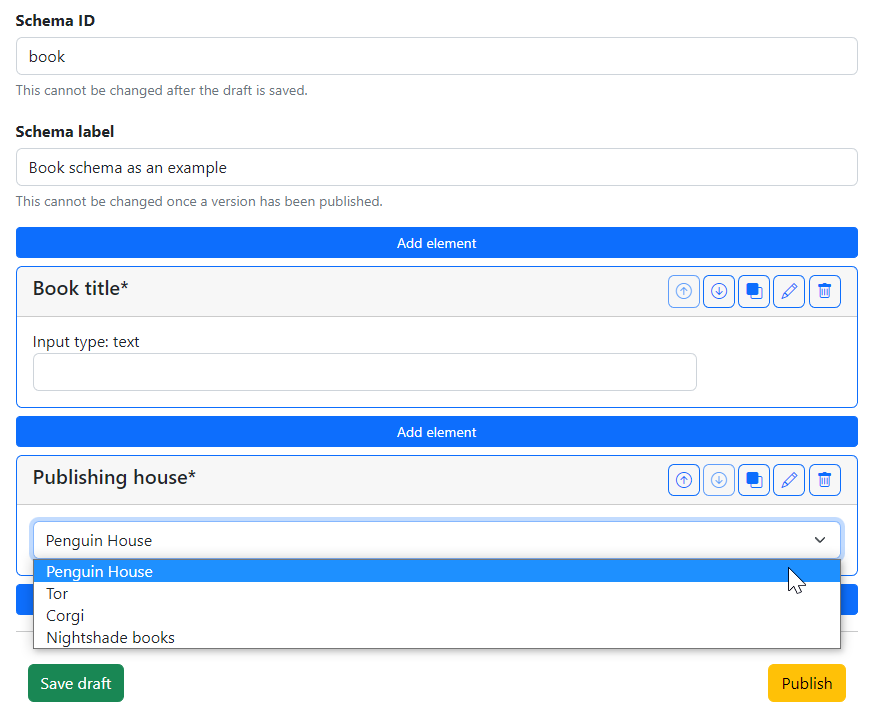
Fig. 1.11 View of a designed single-value multiple-choice field.#
Keep in mind that this new field is displayed by its label Publishing house,
although metadata assigned via this field will have the name
mgs.book.publisher.
1.1.5. Schema publication#
Schemas can be saved at any moment as private drafts with the green Save draft button at the bottom of the schema editor (see Fig. 1.1). Once the schema has at least one field it can already made public with the yellow Publish button (see Fig. 1.9 and Fig. 1.11).
Once we save a draft, a new accordion item is created for the new schema in the page including a tab for the draft version. Fig. 1.12 shows this tab after also adding a non-required checkbox field between Book title and Publishing house and saving the draft.
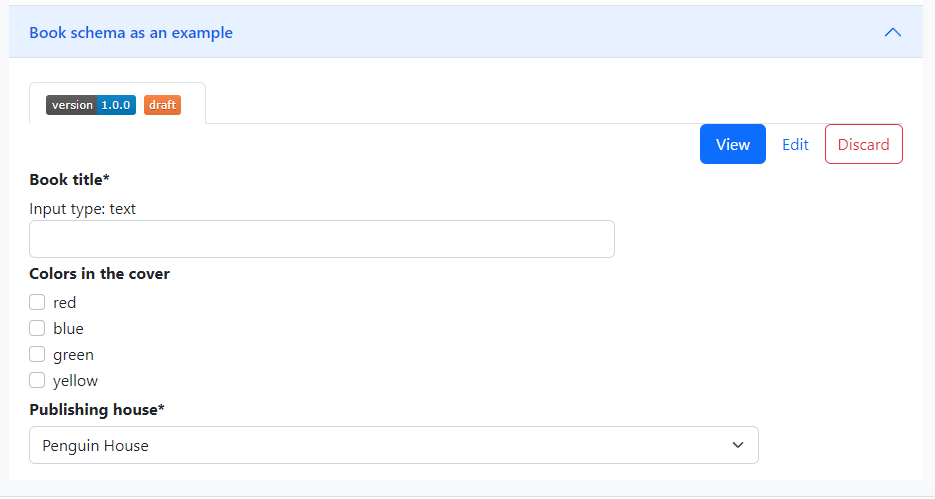
Fig. 1.12 Saved schema draft.#
The tab itself shows the version number and status of this version and contains three buttons: one to view the form as it will be shown when applying metadata, one to edit it, which opens a tab that looks just like the editor we were working on, and one to discard the draft. By clicking on Discard a modal pops up to ask for confirmation: if we accept, all traces of this schema will be removed, because the draft is its only existing version.
While the draft has not been published, we can still edit it: add new fields, change them, reorder them, remove them… It is also possible to change the title or label of the schema itself, but not to change the ID. If we want to add a composite field, you can see in Fig. 1.7 that the editor starts like the editors of other fields, but then just has an Add element button, which behaves exactly like the “Add element” button of a schema: it opens the modal in Fig. 1.3, which in turn opens the modal of the chosen field type.
Fig. 1.13 shows an editor for a composite field to which we have added three simple fields: a required Name and surname of type text, an Age of type integer with a minimum value of 12 and a maximum value of 99, and a required, repeatable Email address of type email.
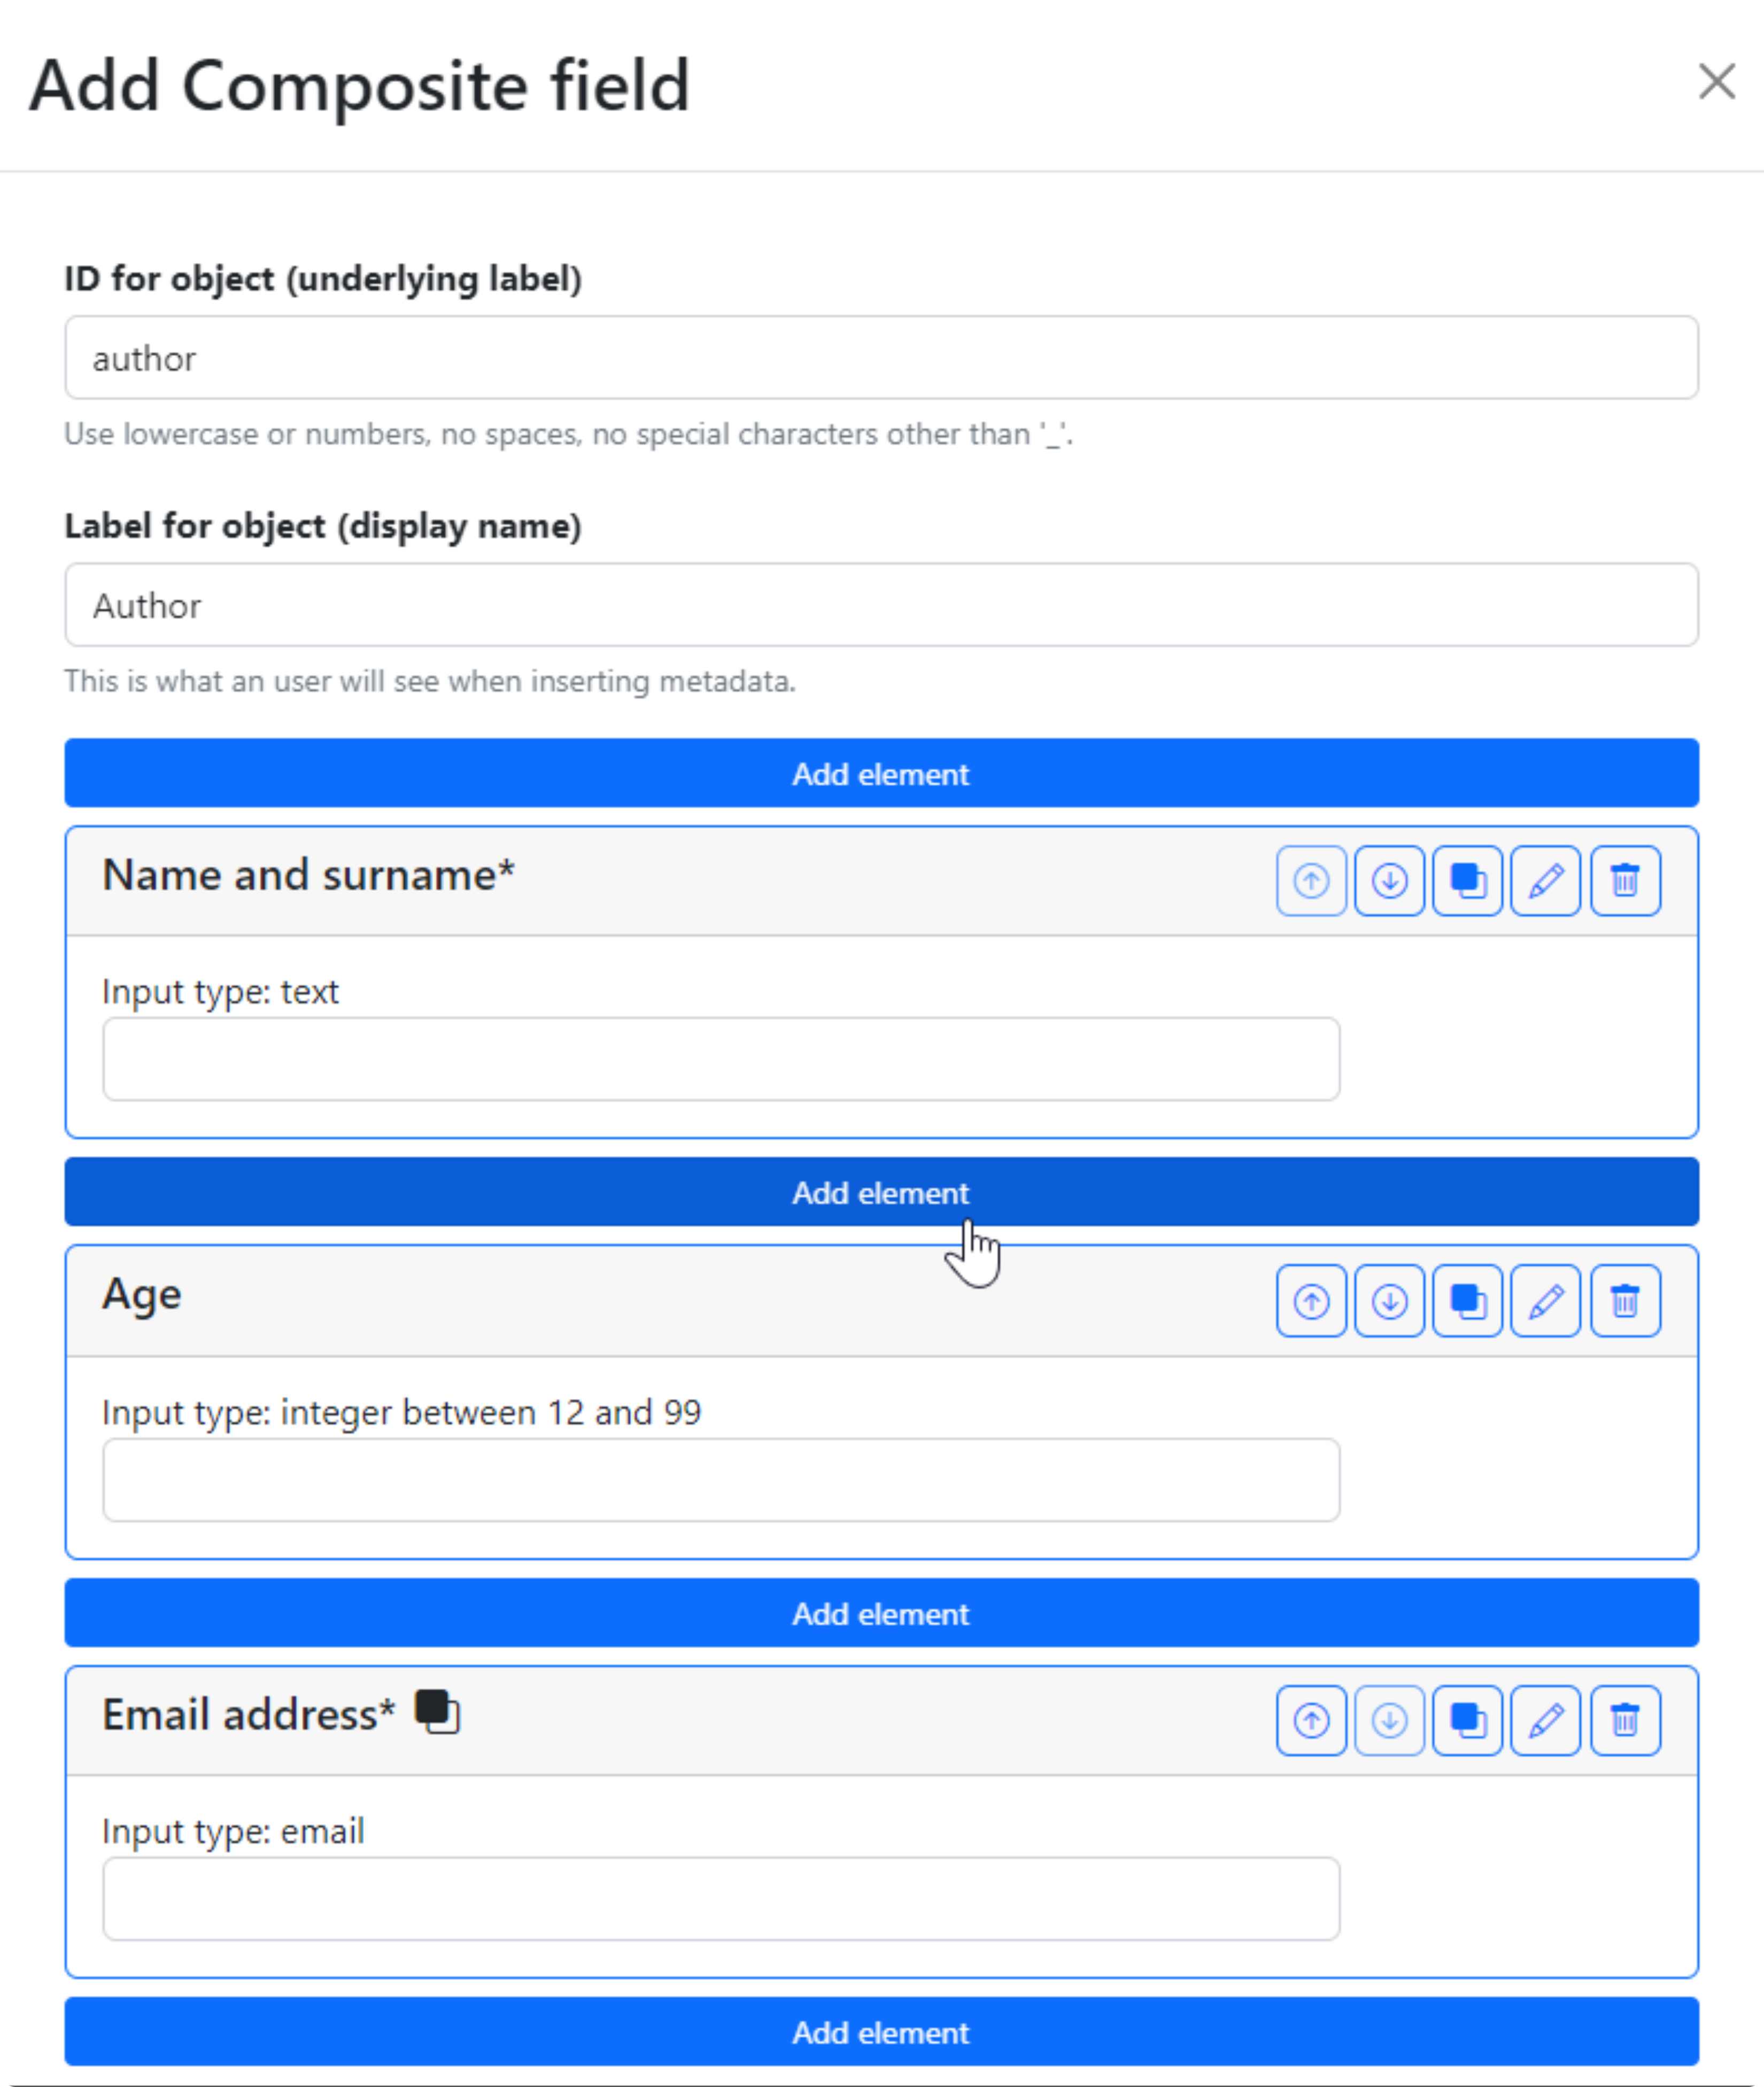
Fig. 1.13 Example filled-in form for a single-value multiple-choice field.#
Once we add the composite field to the schema, its editing box shows its components as they will appear in the final form (see Fig. 1.14). To edit the elements in the composite field, first we need to open the editor of the composite field itself.
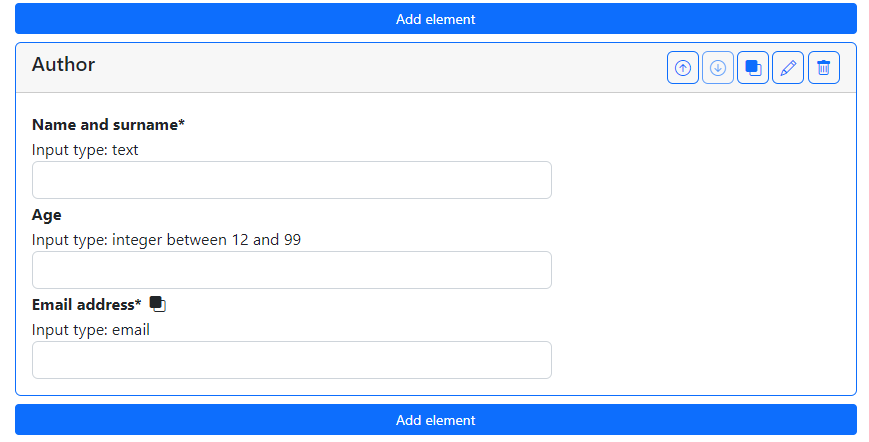
Fig. 1.14 View of a designed single-value multiple-choice field.#
1.2. Versioning and lifecycle#
Once you are satisfied with your draft is ready to be applied, you can publish it. This will update the tab so that the orange badge “draft” is replaced with a green one labeled published, and change the options provided in the top right buttons shown in Fig. 1.15. The “View” tab, which shows the form as it will appear when applying the metadata schema, is the same as for a draft version, but the rest of the buttons have changed.
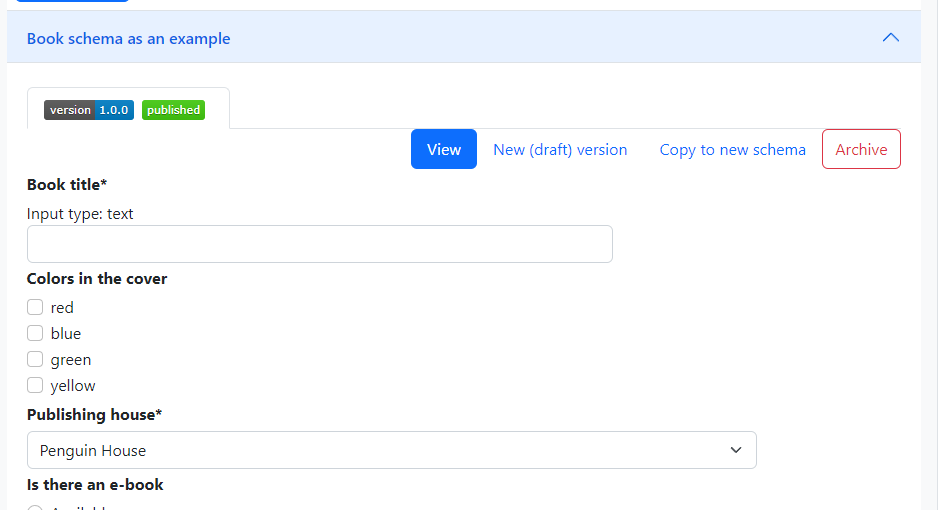
Fig. 1.15 A published version of a schema.#
The buttons New (draft) version and Copy to new schema open editors like Edit did for the draft schemas. The difference between these two editors is that the former creates a new draft for the same schema and the latter starts a whole other schema with the same contents. Saving a new draft will create a new version (in this case 2.0.0) and show it in a second tab next to the published version:
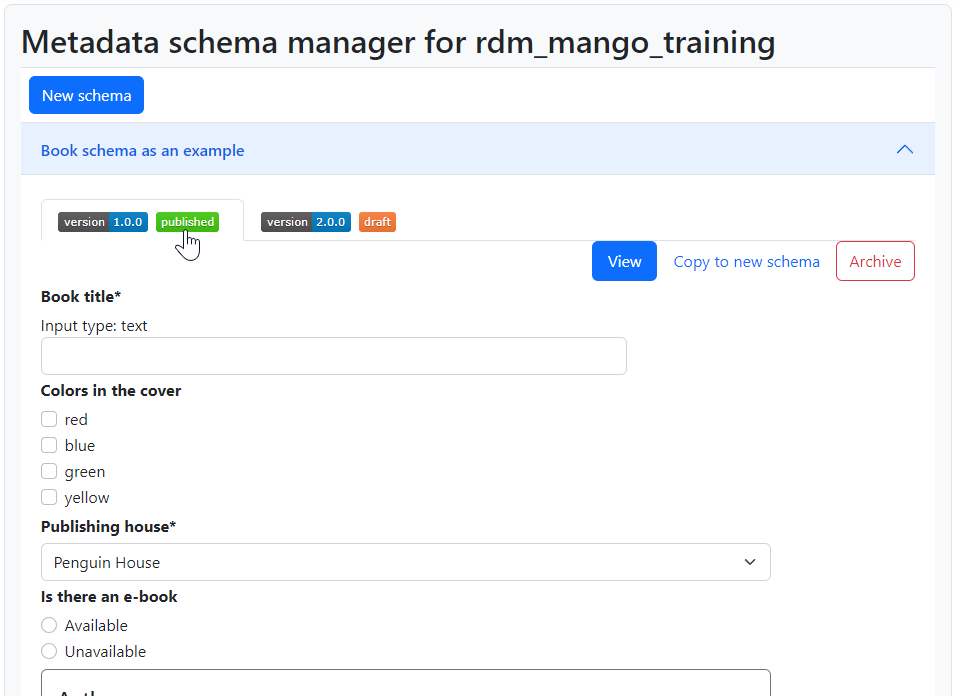
Fig. 1.16 A published version of a schema when a draft exists.#
While a draft version exists, the New (draft) version button is absent. When creating this draft, the Schema ID and label are fixed and cannot be edited. In contrast, in the editor in Copy to new schema (shown in Fig. 1.17) these fields are empty and, in fact, it is not possible to reuse the same Schema ID we had before. Use cases for this feature are derived schemas, i.e. schemas that share many fields with another schema but represent a different thing. The name and version of the published schema it originated from is recorded, but nothing is done with this information yet.
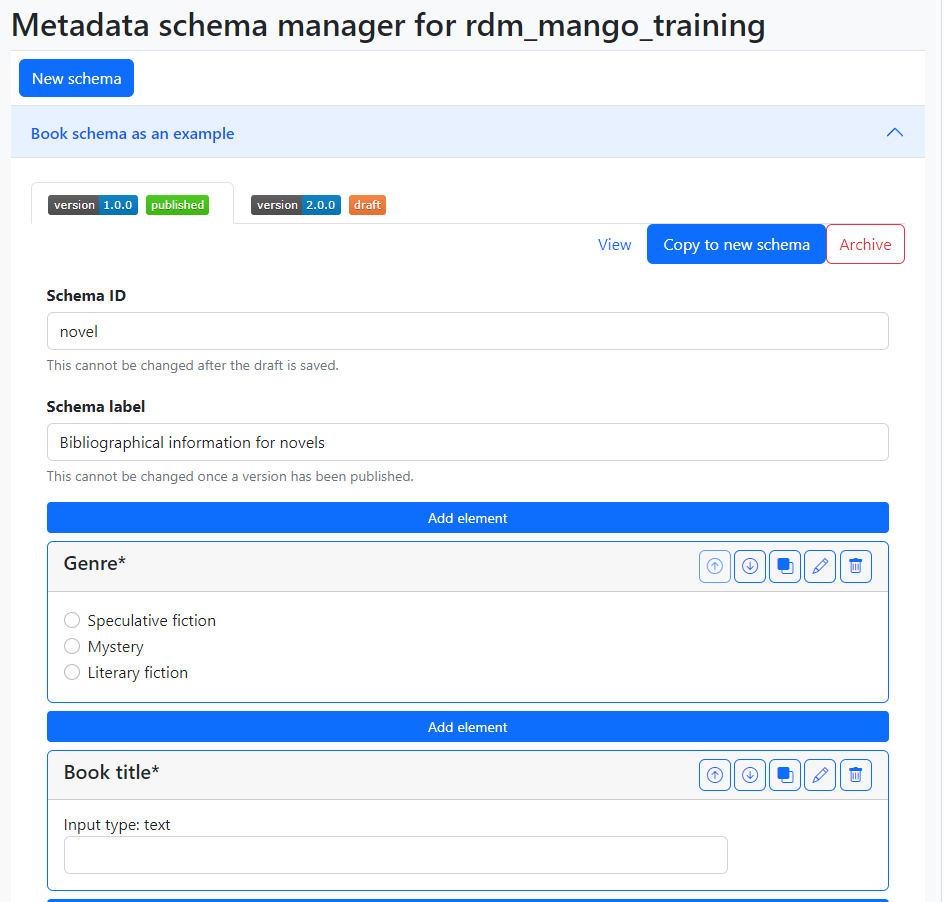
Fig. 1.17 Draft a new schema from a published version of a schema.#
When this copy is saved, a new schema is created, like when we edit one from scratch in “New schema”. This generates a new accordion item with its own “draft” tab containing the version that was just created. Note that it is also possible to publish a version of a schema, even a copy from a published schema, without saving it as a draft first. In Fig. 1.18 we could decide to view and edit this new schema or the previous one by clicking on their name, which expands the appropriate tabs. If we click on “Book schema as an example”, we’ll see that the “Copy to new schema” section has been reset to the original contents of the published version of this schema.

Fig. 1.18 Figure 10: Saved draft of copied schema.#
Archiving a published version of a schema will prevent it from being implemented, but won’t delete it. In the current version of the Metadata Schema Manager, archived versions are not visible either. However, they still exist, and it is not possible to create a new schema with the same ID.
1.3. Apply metadata with a schema#
In order to apply a metadata schema, we first have to move to the Collections tab of the ManGO portal and select the collection or data object to which we want to add metadata. In the Metadata tab, a dropdown will appear with the selection of published schemas:
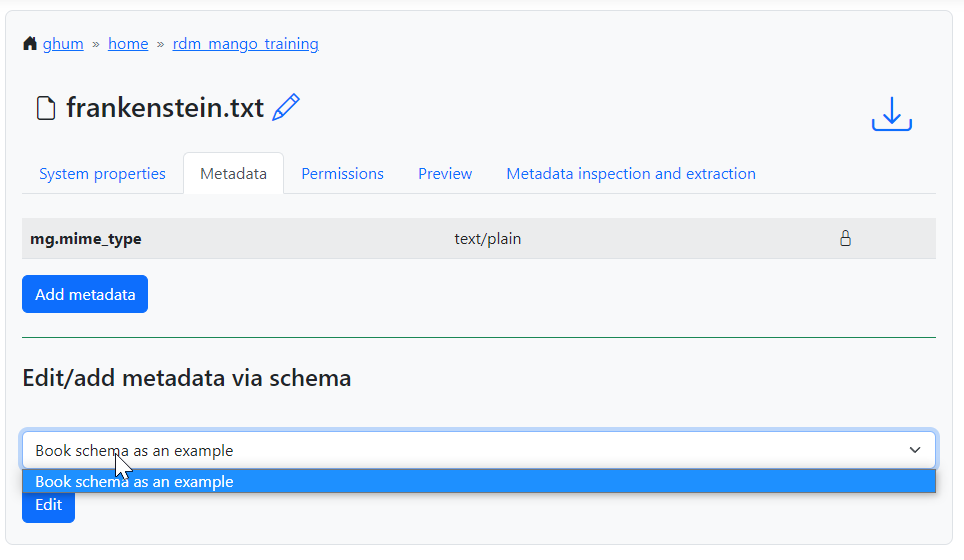
Fig. 1.19 Select a published metadata schema.#
Clicking on Edit will open a page with the following form, which is very similar to what we could see in the “View” tab of the published schema (Fig. 1.15):
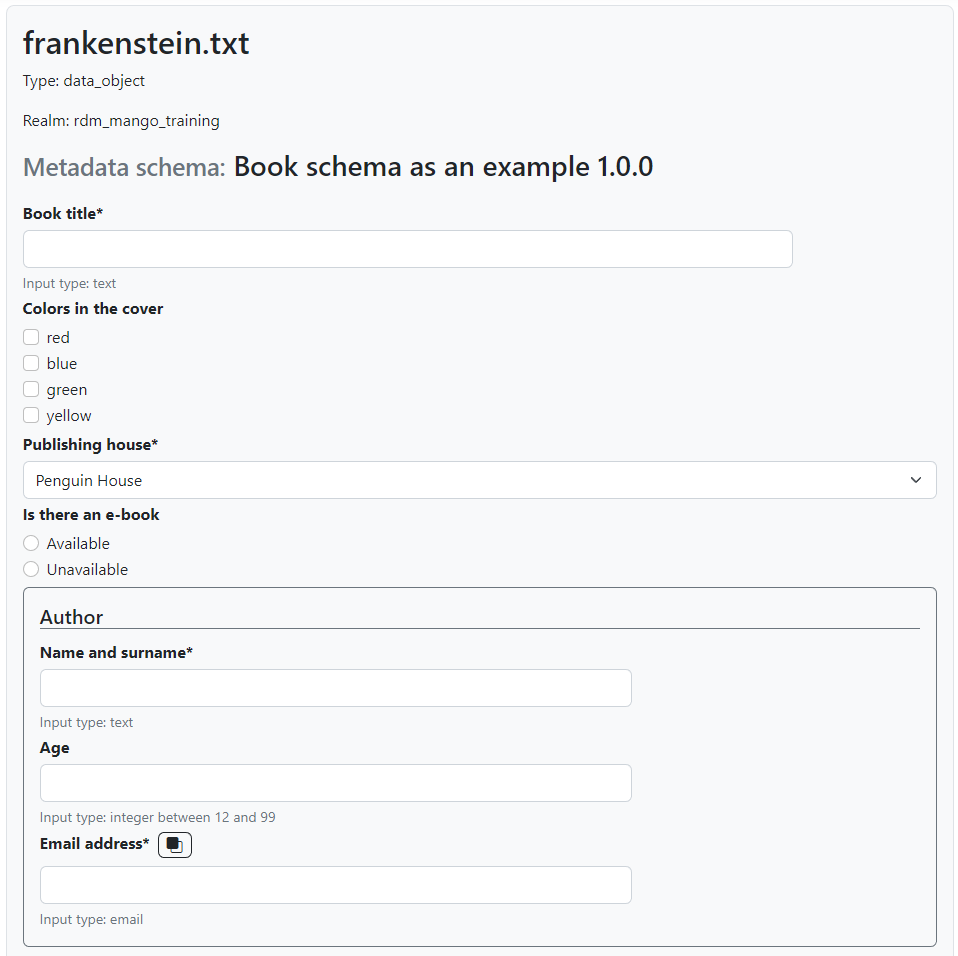
Fig. 1.20 Empty form to apply a metadata schema#
Required fields have an asterisk next to their name, simple fields have a short description under their input fields and repeatable fields have a button that can be used to duplicate them.
If a required field is not filled, it won’t be possible to save the
metadata. Once we do save it, we can see the results in a tab inside the
“Metadata” tab of the object. Fig. 1.21 shows that
the user-facing label of the schema, not its name, is used to name the
tab, and that the labels of the different fields are used in the table
that shows the current annotation. Hovering over the labels will show a
small popover with the name that the AVU takes in Tier-1 Data,
e.g. mgs.book.title for the book title, mgs.book.author.email
for the email address inside the Author composite field, etc. Moreover,
fields for which no values have been provided can still be seen as
empty, to indicate that the schema has not been completely implemented.
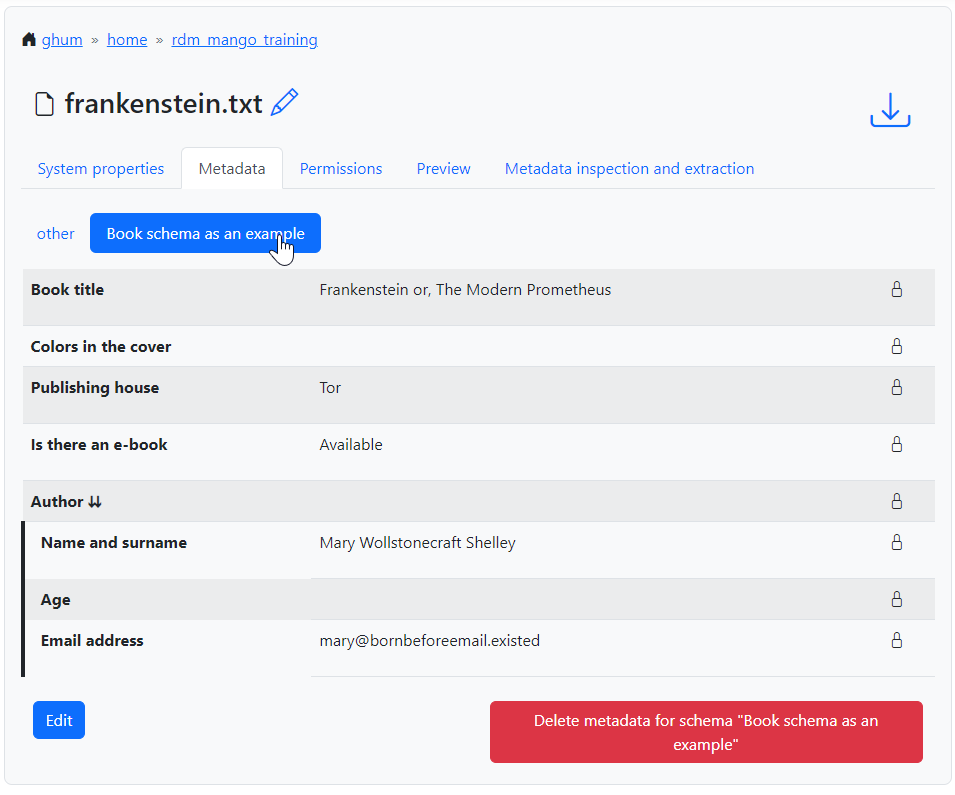
Fig. 1.21 All metadata fields are shown, with or without values.#